排序算法
探究排序算法的工作原理是非常有趣的,但在实际的编码中,你几乎永远也不会需要自己编写排序算法,Swift 自带的 sort() 函数已经非常够用了,但如果你还是好奇背后的原理,请继续阅读。
基本的排序算法:
快速的排序算法:
混合排序:
特殊的排序算法
不好的排序算法(知道就行了,不要用!):
插入排序(Insertion Sort)
目标:把数组从低到高(或从高到低)排序
您将获得按正确的顺序排列一系列数字。插入排序算法的工作原理如下:
把一系列数字放在一个未排序的堆里。
从堆中挑选一个数字。 你选择哪一个并不重要,但从堆顶挑选是最容易。
把这个数插入一个新的数组。
从未排序堆中再选择一个数字,并将其插入之前的数组中。 这个数字在第一个数字之前或之后,所以现在这两个数字被排序。
再从堆中选择一个数字,并将其插入到数组中的正确排序位置。
继续这样做,直到堆里没有数字。 最终得到一个空堆和一个排序的数组。
这就是为什么这被称为“插入”排序,因为你从堆中取一个数字并将其插入数组中的正确排序位置。
例子
假设这边有需要排序的一些数字 [ 8, 3, 5, 4, 6 ]。
选择第一个数字8,然后将其插入新数组中。 新数组是空的,所以插入很容易。 排序的数组现在是[8],堆是[3,5,4,6]。
从堆中选择下一个数字3,然后将其插入到已排序的数组中。 3应该在8之前,所以排序的数组现在是[3,8],而堆被缩减为[5,4,6]。
从堆中选择下一个数字5,然后将其插入到已排序的数组中。 5介于3和8之间。 排序的数组是[3,5,8],堆是[4,6]。
重复上面的过程直到堆为空。
原地排序
译注:原地排序就是指在排序过程中不申请多余的存储空间,只利用原来存储待排数据的存储空间进行比较和交换的数据排序。包括:希尔排序、冒泡排序、插入排序、选择排序、堆排序、快速排序。
上面的解释使你看起来需要两个数组:一个用于存放未排序的堆,另一个用于存放按次序排好的数字。
但您可以执行原地插入排序,而无需创建单独的数组。 您只需追踪数组的哪个部分已经排序,哪个部分是未排序。
最初,数组是[8,3,5,4,6]。 |条显示已排序部分的结束位置和堆的开始位置:
[| 8, 3, 5, 4, 6 ]这表明排序的部分是空的,堆开始于8。
处理完第一个数字后,结果为:
[ 8 | 3, 5, 4, 6 ]排好序的部分是[8],未排序的堆是[ 3, 5, 4, 6 ]。|条向右移动了一个位置。
下面是排序期间数组内容的变化过程:
	[| 8, 3, 5, 4, 6 ]
	[ 8 | 3, 5, 4, 6 ]
	[ 3, 8 | 5, 4, 6 ]
	[ 3, 5, 8 | 4, 6 ]
	[ 3, 4, 5, 8 | 6 ]
[ 3, 4, 5, 6, 8 |]每一步,|条向右移动一个位置。 如您所见,数组的开始到|部分总是排好序的。堆缩小一位置,排序部分增加一位置,直到堆变为空的,没有更多未排序的数字为止。
怎么插入
每一步,您从未排序堆中选择最顶部的数字,并将其插入到数组的已排序部分。 但必须将该数字插入适当的位置,以便数组的从头开始保持排序。 这是如何运作的?
假设我们已经完成了前几个元素,数组看起来像这样:
[ 3, 5, 8 | 4, 6 ]要排序的下一个数字是4。 我们需要将它插入到已经排好序的[3,5,8]中。
一种方法是:查看前一个元素8。
[ 3, 5, 8, 4 | 6 ]
        ^
前一个元素比4大吗? 是的,所以4应该在8之前。 我们交换这两个数字得到:
[ 3, 5, 4, 8 | 6 ]
        <-->
        交换
还没有完成。 新的前一个元素5也大于4。 我们还需交换这两个数字:
[ 3, 4, 5, 8 | 6 ]
     <-->
     交换
再看一下前面的元素。 3大于4吗? 不大于, 这意味着我们完成了数字4保持排序的插入。
下一节将对插入排序算法的内部循环的进行描述,通过交换数字将数字从堆的顶部插入到已排序的部分。
代码
下面插入排序的Swift实现:
func insertionSort(_ array: [Int]) -> [Int] {
    var a = array			 // 1
    for x in 1..<a.count {		 // 2
        var y = x
        while y > 0 && a[y] < a[y - 1] { // 3
            a.swapAt(y - 1, y)
            y -= 1
        }
    }
    return a
}
代码在 playground 里测试:
let list = [ 10, -1, 3, 9, 2, 27, 8, 5, 1, 3, 0, 26 ]
insertionSort(list)
代码工作原理:
先创建一个数组的拷贝。因为我们不能直接修改参数
array中的内容,所以这是非常必要的。insertionSort()会返回一个原始数组的拷贝,就像Swift已拥有的sort()方法一样。在函数里有两个循环,外循环依次查找数组中的每一个元素;这就是从数字堆中取最上面的数字的过程。变量
x是有序部分结束和堆开始的索引(也就是 | 符号的位置)。要记住的是,在任何时候,从0到x的位置数组都是有序的,剩下的则是无序的。内循环则从
x位置的元素开始查找。x是堆顶的元素,它有可能比前面的所有元素都小。内循环从有序数组的后面开始往前查找。每次找到一个大的元素,就交换它们的位置,直到内层循环结束,数组的前面部分依然是有序的,有序的元素也增加了一个。
注意: 外层循环是从1开始,而不是0。从堆顶将第一个元素移动到有序数组没有任何意义,可以跳过。
不交换
上面的插入排序算法可以很好的完成任务,但是也可以通过移除对 swap() 的调用来提升速度。
通过交换两个数字来让下一个元素移动到合适的位置的:
[ 3, 5, 8, 4 | 6 ]
        <-->
        swap

[ 3, 5, 4, 8 | 6 ]
     <-->
     swap
可以通过将前面的元素往右挪一个位置来代替元素的交换,然后将新的数字放到正确的位置。
[ 3, 5, 8, 4 | 6 ]   remember 4
           *

[ 3, 5, 8, 8 | 6 ]   shift 8 to the right
        --->

[ 3, 5, 5, 8 | 6 ]   shift 5 to the right
     --->

[ 3, 4, 5, 8 | 6 ]   copy 4 into place
     *
代码:
func insertionSort(_ array: [Int]) -> [Int] {
  var a = array
  for x in 1..<a.count {
    var y = x
    let temp = a[y]
    while y > 0 && temp < a[y - 1] {
      a[y] = a[y - 1]                // 1
      y -= 1
    }
    a[y] = temp                      // 2
  }
  return a
}
//1 这行代码就是将前一个元素往右移动一个位置,在内层循环结束的时候, y 就是 插入的数字 在有序数组中的位置, //2 这行代码就是将数字拷贝到正确的位置。
泛型化
如果能排序的类型不止数字就更好了。我们可以使数组的数据类型泛型化,然后使用一个用户提供的函数(或闭包)来执行比较操作。这只要改变两个地方。
函数签名变成:
译注:函数签名的英文原文是 function signature,而我们常接触到是 函数声明(function declaration),这两个概念都是有的,暂且不去追究它们的区别了,此处就译为函数签名,应该不影响对下面文章的理解。
func insertionSort<T>(_ array: [T], _ isOrderedBefore: (T, T) -> Bool) -> [T] {数组有一个类型 [T],[T] 是泛型化的一个占位类型。现在 insertionSort() 可以接收任何类型的数组,不管它是包含数字、字符串或者其它类型。
新的参数 isOrderedBefore: (T, T) -> Bool 是一个接收两个 T 对象然后返回一个 Bool 值的方法,如果第一个对象大于第二个,那么返回 true,反之则返回 false。这与 Swift 内置的 sort() 方法是一样的。
另外一个变化就是内循环,现在是这样的:
while y > 0 && isOrderedBefore(temp, a[y - 1]) {temp < a[y - 1]被 isOrderedBefore() 替代,不仅可以比较数字,还可以比较各种对象了。
在 playground 中测试:
let numbers = [ 10, -1, 3, 9, 2, 27, 8, 5, 1, 3, 0, 26 ]
insertionSort(numbers, <)
insertionSort(numbers, >)
< 和 > 决定排序的顺序,分别代表低到高和高到低。
译注:参数isOrderedBefore可以使用<或>,是因为在Swift中运算符定义就类似(T, T) -> Bool。
在Foundation中可以看到不同类型定义了运算符,比如Decimal就定义了<:public static func < (lhs: Decimal, rhs: Decimal) -> Bool。
Swift文档介绍了Custom Operators可以参考。
当然,我们也可以对其它数据类型排序如字符串:
let strings = [ "b", "a", "d", "c", "e" ]
insertionSort(strings, <)
也可以是更复杂的对象:
let objects = [ obj1, obj2, obj3, ... ]
insertionSort(objects) { $0.priority < $1.priority }
闭包告诉 insertionSort() 方法用 priority 属性来进行排序。
插入排序是一个 稳定 的排序算法。当元素相同时,排序后依然保持排序之前的相对顺序,那么这个排序算法就是 稳定 的。对于像数字或者字符串这样的简单类型来说,这不是很重要。但是对于复杂的对象来说,这就很重要了,如果两个对象有相同的 priority, 不管它们其他的属性如何,这两个对象都不会交换位置。
性能
如果数组是已经排好序的话,插入排序是非常快速的。这听起来好像很明显,但是不是所有的搜索算法都是这样的。在实际中,有很多数据(大部分,可能不是全部)是已经排序好的,插入排序在这种情况下就是一个非常好的选择。
插入排序的最差和平均性能是 O(n^2)。这是因为在函数里有两个嵌套的循环。其他如快速排序和归并排序的性能则是 O(n log n),在有大量输入的时候会更快。
插入排序在对小数组进行排序的时候实际是非常快的。一些标准库在数据量小于或者等于10的时候会从快速排序切换到插入排序。
我们做了一个速度测试来对比我们的 insertionSort() 和 Swift 内置的 sort()。在大概有 100 个元素的数组中,速度上的差异非常小。然后,如果输入一个非常大的数据量, O(n^2) 马上就比 O(n log n) 的性能糟糕多了,插入排序差很多。
扩展阅读
选择排序(Selection Sort)
目标:将数组从低到高(或从高到低)排序。
您将获得一系列需要按正确顺序排列的数字。 选择排序算法将数组分为两部分:数组的开头是排序的,数组的其余部分是仍然需要排序的数字。
[ ...sorted numbers... | ...unsorted numbers... ]这类似于插入排序,但区别在于如何将新数字添加到已排序部分。
它的工作原理如下:
找到数组中的最小数字。 从索引0开始,遍历数组中的所有数字,并追踪最小数字的位置。
使用索引0处的数字交换最小数字。现在,已排序部分仅包含索引0处的数字。
转到索引1处。
找到数组其余部分中的最小数字。 从索引1开始查看。再次循环直到数组结束并追踪最小数字。
使用索引1处的数字交换最小数字。现在,已排序部分包含两个数字,索引0和索引1。
转到索引2处。
从索引2开始,找到数组其余部分中的最小数字,并将其与索引2处的数字交换。现在,数组从索引0到2已排序; 此范围包含数组中的三个最小数字。
并继续,直到没有数字需要排序。
这种排序方式之所以被称为“选择”排序,是因为在每个步骤中,都是在数组的其余部分里搜索选择下一个最小数字。
例子
假设要排序的数字是[5,8,3,4,6]。 用|符号表示数组的已排序部分的结束位置(讲述插入排序时也是如此表示的)。
最初,排序部分为空:
[| 5, 8, 3, 4, 6 ]现在我们找到数组中的最小数字。 从|栏开始向右扫描数组,找到数字3。
要将此数字放入已排序的位置,将它与|旁边的数字5交换(然后把|向右移动一位):
[ 3 | 8, 5, 4, 6 ]
* *排序部分现在是[3],其余部分是[8,5,4,6]。
再一次,我们从|栏开始寻找最低的数字。 我们找到4并用8与之交换得到(同样把|向右移动一位):
[ 3, 4 | 5, 8, 6 ]
* *每一步,|栏都会向右移动一个位置。 我们再次查看数组的其余部分,找到5是最小数字。 没有必要与自己交换,只需|栏前进:
[ 3, 4, 5 | 8, 6 ]
        *
重复此过程,直到数组都排序了。 请注意,|栏左侧的所有内容始终按排序顺序排列,并且始终包含数组中的最小数字。 最后,我们最终得到:
[ 3, 4, 5, 6, 8 |]选择排序是原地排序,因为所有内容都发生在同一个数组中而不使用额外的内存。您也可以将其实现为 稳定排序,以便相同的元素不会相互交换(请注意,下面给出的版本不稳定)。
代码
这是Swift中选择排序的一个实现:
func selectionSort(_ array: [Int]) -> [Int] {
  guard array.count > 1 else { return array }  // 1

  var a = array                    // 2

  for x in 0 ..< a.count - 1 {     // 3

    var lowest = x
    for y in x + 1 ..< a.count {   // 4
      if a[y] < a[lowest] {
        lowest = y
      }
    }

    if x != lowest {               // 5
      a.swapAt(x, lowest)
    }
  }
  return a
}
将此代码放在 playground 测试:
let list = [ 10, -1, 3, 9, 2, 27, 8, 5, 1, 3, 0, 26 ]
selectionSort(list)
代码逐步说明:
如果数组为空或仅包含单个元素,则无需排序。
生成数组的副本。 这是必要的,因为我们不能直接在Swift中修改
array参数的内容。 与Swift的sort()函数一样,selectionSort()函数将返回排完序的原始数组拷贝。函数内有两个循环。 外循环依次查看数组中的每个元素; 这就是向前移动
|栏的原因。内循环实现找到数组其余部分中的最小数字。
使用当前数组索引数字交换最小数字。
if判断是必要的,因为你不能在Swift中swap()同一个元素。译注:Swift中的数组没有
swap()方法,只有swapAt()方法,而且swapAt()交换同一个元素是没有问题的。这可能是Swift版本更新的问题。
总结:对于数组的每个元素,选择排序使用数组其余部分中的最小值交换位置。结果,数组从左到右排序。(你也可以从右到左进行,在这种情况下你总是寻找数组中最大的数字。试一试!)
注意: 外循环以索引a.count - 2结束。 最后一个元素将自动处于正确的位置,因为此时没有剩下其他较小的元素了。源文件SelectionSort.swift是一个使用泛型的函数版本,因此您也可以使用它来对字符串和其他数据类型进行排序。
性能
选择排序很容易理解,但执行速度慢 O(n^2)。它比插入排序更糟,但优于冒泡排序。查找数组其余部分中的最低元素很慢,特别是因为内部循环将重复执行。
堆排序使用与选择排序相同的原则,但使用了一种快速方法在数组的其余部分中查找最小值。 堆排序性能是 O(nlogn)。
扩展阅读
希尔排序(Shell Sort)
希尔排序是插入排序的一种更高效的改进版本,方法是将原始列表分成较小的子列表,然后使用插入排序对其进行单独排序。
Sapientia大学创建了一个很好的视频,显示了匈牙利民间舞蹈的过程。(译注:类似希尔排序的过程,油管视频需要翻墙)
怎么运行的
插入排序是比较相连的元素,如果它们顺序不对就交换它们,而希尔排序算法会比较相距很远的元素。
元素之间的距离称为 gap。 如果被比较的元素的顺序错误,则它们会在 gap 中交换。 这消除了插入排序中常见的许多中间副本。
译注: gap已经被翻译成步长/增量/间距等,为了避免歧义,本文就不做翻译,直接写成gap
这个想法是,通过在大 gap 上移动元素,数组变得非常快速地部分排序。 这使得之后的排序过程更快,因为他们不再需要交换那么多项。
一轮完成后,gap变小,新一轮开始。 这将重复,直到 gap 大小为1,此时算法的功能就像插入排序一样。 但是由于数据已经很好地排序,所以最后一轮可以非常快。
例子
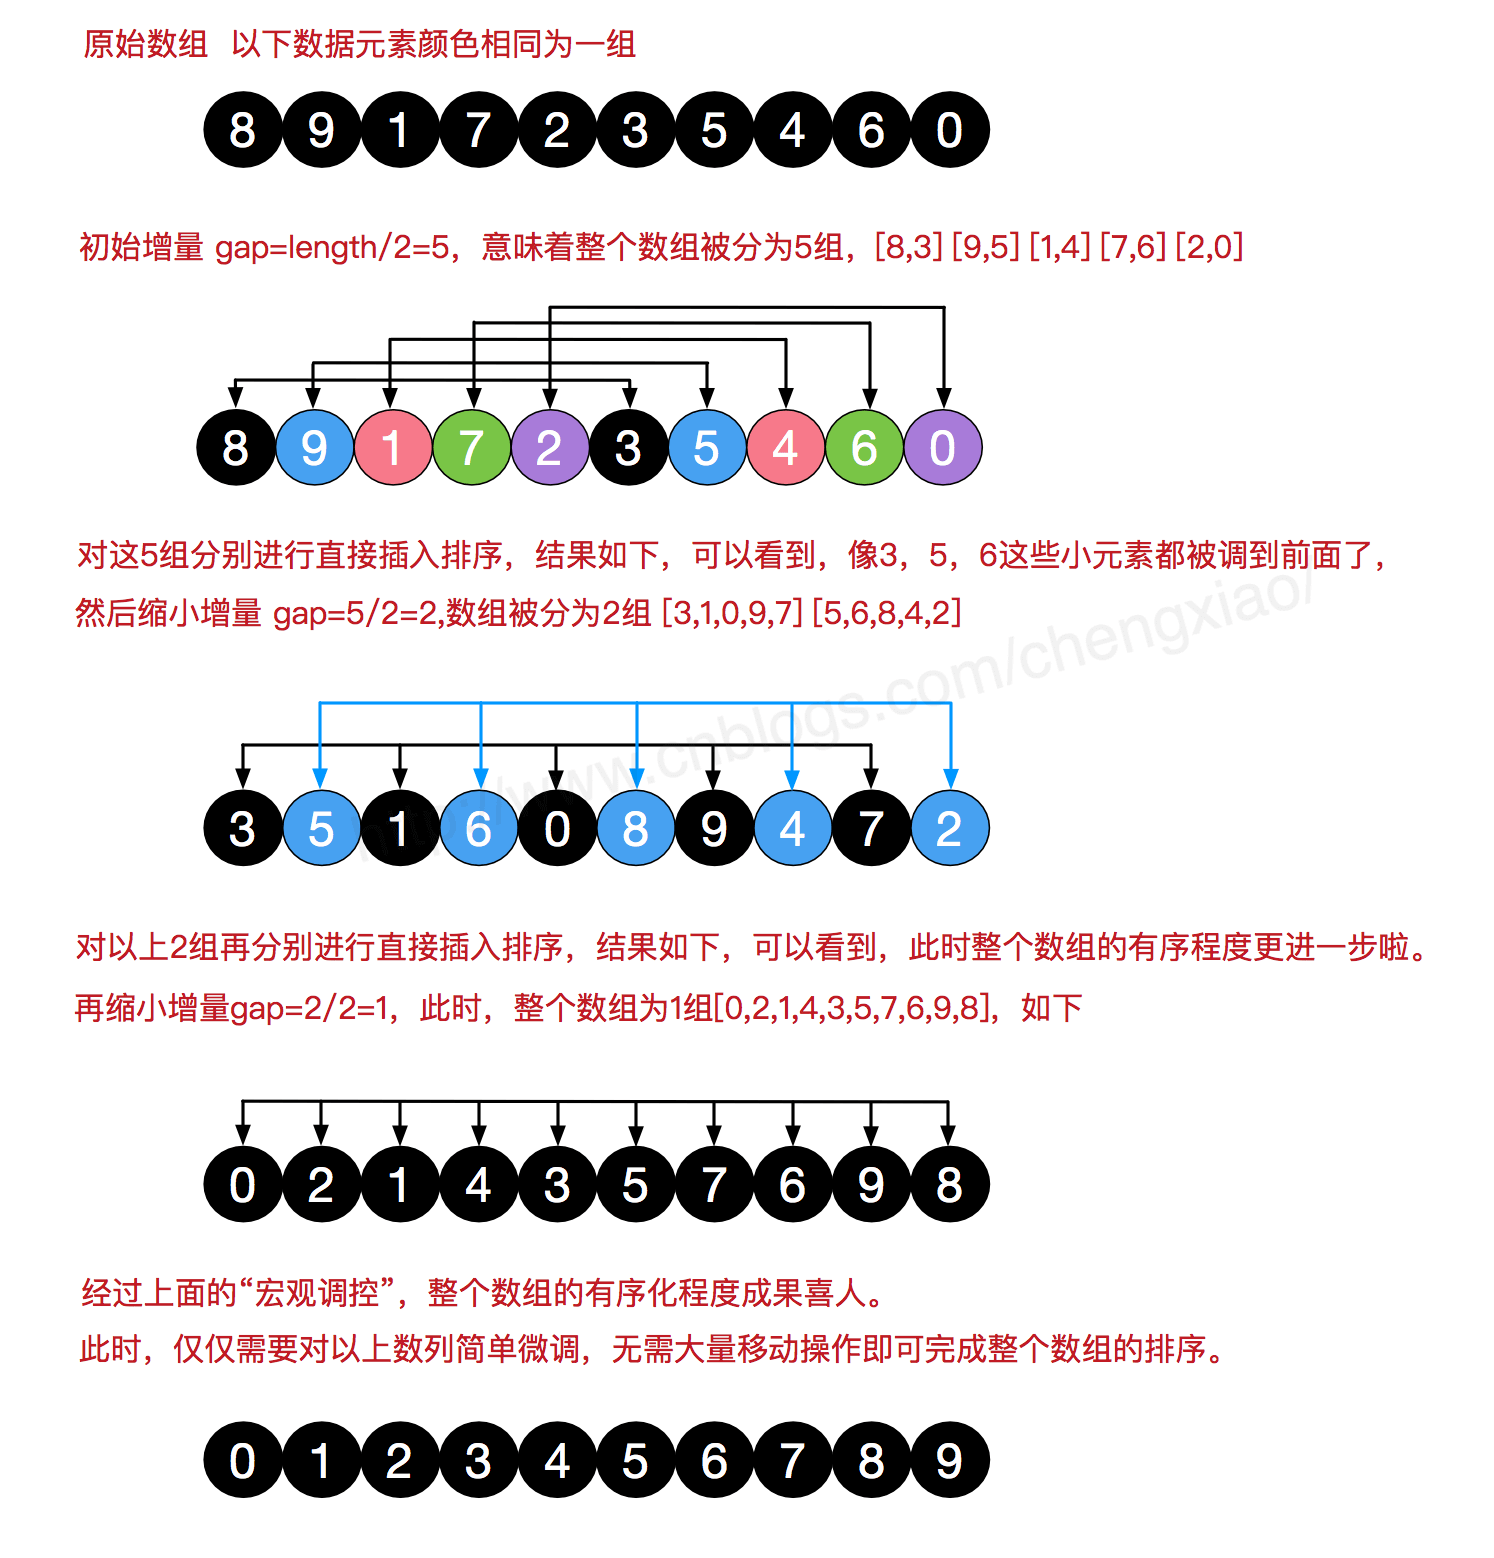
假设我们想使用希尔排序对数组 [64, 20, 50, 33, 72, 10, 23, -1, 4] 进行排序。
我们首先将数组的长度除以2:
n = floor(9/2) = 4这是 gap 大小。
我们创建n子列表。 在每个子列表中,每一项的间隔是大小为n的gap 。 在我们的示例中,我们需要制作其中四个子列表。 子列表按insertionSort()函数排序。
这可能没有多大意义,所以让我们仔细看看会发生什么。
第一轮如下。 我们有n = 4,所以我们制作了四个子列表:
sublist 0:  [ 64, xx, xx, xx, 72, xx, xx, xx, 4  ]
sublist 1:  [ xx, 20, xx, xx, xx, 10, xx, xx, xx ]
sublist 2:  [ xx, xx, 50, xx, xx, xx, 23, xx, xx ]
sublist 3:  [ xx, xx, xx, 33, xx, xx, xx, -1, xx ]
如您所见,每个子列表仅包含原始数组中的每间隔4的项。 不在子列表中的项用xx表示。 所以第一个子列表是[64,72,4],第二个子列表是[20,10],依此类推。 我们使用这个“gap”的原因是我们不必实际制作新的数组。 相反,我们将它们交织在原始数组中。
我们现在在每个子列表上调用一次insertionSort()。
插入排序的这个特定版本从后面到前面排序。子列表中的每个项目都与其他项目进行比较。如果它们的顺序错误,则交换值并一直向下移动,直到我们到达子列表的开头。
因此对于子列表0,我们将4与72交换,然后将4与64交换。 排序后,此子列表如下所示:
sublist 0: [ 4, xx, xx, xx, 64, xx, xx, xx, 72 ]排序后的其他三个子列表:
sublist 1:  [ xx, 10, xx, xx, xx, 20, xx, xx, xx ]
sublist 2:  [ xx, xx, 23, xx, xx, xx, 50, xx, xx ]
sublist 3:  [ xx, xx, xx, -1, xx, xx, xx, 33, xx ]
完整的数组看上去是:
[ 4, 10, 23, -1, 64, 20, 50, 33, 72 ]它还没有完全排序,但它比以前更加排序。 这完成了第一次轮操作。
在第二轮中,我们将 gap 大小除以2:
n = floor(4/2) = 2这意味着我们现在只创建两个子列表:
sublist 0:  [  4, xx, 23, xx, 64, xx, 50, xx, 72 ]
sublist 1:  [ xx, 10, xx, -1, xx, 20, xx, 33, xx ]
每个子列表包含每个间隔为2的项。 我们再次调用insertionSort()来对这些子列表进行排序。 结果是:
sublist 0:  [  4, xx, 23, xx, 50, xx, 64, xx, 72 ]
sublist 1: [ xx, -1, xx, 10, xx, 20, xx, 33, xx ]请注意,在每个列表中只有两个元素位置顺序不对(译注:sublist 0是64和50,sublist 1是10和-1)。 因此插入排序非常快。 那是因为我们已经在第一轮中对数组进行了一些排序。
总数组现在看起来像这样:
[ 4, -1, 23, 10, 50, 20, 64, 33, 72 ]这样就完成了第二轮。 最后一轮的gap是:
n = floor(2/2) = 1
gap 大小为1表示我们只有一个子列表,即数组本身,我们再次调用insertionSort()对其进行排序。 最终排序的数组是:
[ -1, 4, 10, 20, 23, 33, 50, 64, 72 ]在大多数情况下,希尔排序的性能为O(n^2),如果幸运,则为 O(nlogn)。 该算法是不稳定的排序; 它可能会改变具有相等值的元素的相对顺序。
gap 序列
“ gap 序列”确定 gap 的初始大小以及每次迭代如何使 gap 变小。 良好的 gap 序列对于希尔排序表现良好非常重要。
上面实现例子中的 gap 序列是希尔原始版本中的 gap 序列:初始值是数组大小的一半,然后每次除以2。 还有其他方法可以计算 gap 序列。
只是为了好玩...
这是 Matthijs 很久以前使用的一个旧的Commodore 64 BASIC版本的希尔排序,并且移植到他曾经使用的几乎所有编程语言中:
61200 REM S is the array to be sorted
61205 REM AS is the number of elements in S
61210 W1=AS
61220 IF W1<=0 THEN 61310
61230 W1=INT(W1/2): W2=AS-W1
61240 V=0
61250 FOR N1=0 TO W2-1
61260 W3=N1+W1
61270 IF S(N1)>S(W3) THEN SH=S(N1): S(N1)=S(W3): S(W3)=SH: V=1
61280 NEXT N1
61290 IF V>0 THEN 61240
61300 GOTO 61220
61310 RETURN
代码
希尔排序的Swift实现:
public func insertSort(_ list: inout[Int], start: Int, gap: Int) {
    for i in stride(from: (start + gap), to: list.count, by: gap) {
        let currentValue = list[i]
        var pos = i
        while pos >= gap && list[pos - gap] > currentValue {
            list[pos] = list[pos - gap]
            pos -= gap
        }
        list[pos] = currentValue
    }
}

public func shellSort(_ list: inout [Int]) {
    var sublistCount = list.count / 2
    while sublistCount > 0 {
        for pos in 0..<sublistCount {
            insertionSort(&list, start: pos, gap: sublistCount)
        }
        sublistCount = sublistCount / 2
    }
}

var arr = [64, 20, 50, 33, 72, 10, 23, -1, 4, 5]

shellSort(&arr)
扩展阅读
Rosetta code的希尔排序(译注:大概70种不同语言实现希尔排序??)
作者:Mike Taghavi,Matthijs Hollemans
翻译:Andy Ron
校对:Andy Ron
翻译后补充
希尔排序,也称递减增量排序算法,按其设计者希尔(Donald Shell)的名字命名,在1959年公布。
定义
希尔排序是将待排序的数组元素按下标的一定增量分组 ,分成多个子序列,然后对各个子序列进行直接插入排序算法排序;然后依次缩减增量再进行排序,直到增量为1时,进行最后一次直接插入排序,排序结束。
希尔排序的原理图
图片一来源:图解排序算法(二)之希尔排序
图片二来源:排序:希尔排序(算法)

一个希尔排序的动画
Comparison Sorting Algorithms
参考
快速排序(Quicksort)
目标:将数组从低到高(或从高到低)排序。
快速排序是历史上最着名的算法之一。 它是由Tony Hoare于1959年发明的,当时递归仍然是一个相当模糊的概念。
这是Swift中的一个实现,应该很容易理解:
func quicksort<T: Comparable>(_ a: [T]) -> [T] {
  guard a.count > 1 else { return a }

  let pivot = a[a.count/2]
  let less = a.filter { $0 < pivot }
  let equal = a.filter { $0 == pivot }
  let greater = a.filter { $0 > pivot }

  return quicksort(less) + equal + quicksort(greater)
}
译注:pivot 中心点,枢轴,基准。本文的pivot都翻译成“基准”。
将此代码放在playground 进行测试:
let list = [ 10, 0, 3, 9, 2, 14, 8, 27, 1, 5, 8, -1, 26 ]
quicksort(list)
谈一谈工作原理。 给定一个数组时,quicksort()根据“基准”变量将它分成三部分。这里,基准被视为数组中间的元素(稍后您将看到选择基准的其他方法)。
比基准元素小的所有元素都进入一个名为less的新数组。 所有等于基准元素都进入equal数组。你猜对了,所有比基准更大的元素进入第三个数组,greater。 这就是泛型类型T必须符合Comparable协议的原因,因为我们需要将元素与<,==和>进行比较。
一旦我们有了这三个数组,quicksort()递归地对less数组和more数组进行排序,然后将那些已排序的子数组与equal数组组合在一起,得到最终结果。
一个例子
让我们来看看这个例子。 数组最初是:
[ 10, 0, 3, 9, 2, 14, 8, 27, 1, 5, 8, -1, 26 ]首先,我们选择基准8,因为它在数组的中间。 现在我们将数组拆分为少,相等和大的部分:
less:    [ 0, 3, 2, 1, 5, -1 ]
equal:   [ 8, 8 ]
greater: [ 10, 9, 14, 27, 26 ]这是一个很好的拆分,因为less和greater大致包含相同数量的元素。 所以我们选择了一个很好的基准,将数组从中间分开。
请注意,less和greater数组尚未排序,因此我们再次调用quicksort()来排序这两个子数组。这与之前完全相同:选择一个中间元素并将子数组分成三个更小的部分。
来看看less数组:
[ 0, 3, 2, 1, 5, -1 ]基准元素是中间的1(你也可以选择2,这没关系)。我们再次围绕基准元素创建了三个子数组:
less:    [ 0, -1 ]
equal:   [ 1 ]
greater: [ 3, 2, 5 ]我们还没有完成,quicksort()再次在less和more数组上被递归调用。 让我们再看一下less:
[ 0, -1 ]这次基准元素选择-1。 现在的子数组是:
less:    [ ]
equal:   [ -1 ]
greater: [ 0 ]less数组是空的,因为没有小于-1的值; 其他数组各包含一个元素。 这意味着我们已经完成了递归,现在我们返回以对前一个greater数组进行排序。
greater数组是:
[ 3, 2, 5 ]这与以前的工作方式相同:我们选择中间元素2作为基准元素,子数组为:
less:    [ ]
equal:   [ 2 ]
greater: [ 3, 5 ]请注意,如果在这里选择3作为基准会更好 —— 会早点完成。 然而现在我们必须再次递归到greater数组以确保它被排序。这就体现,选择好的基准有多重要了。当你选择太多“bad”基准时,快速排序实际上变得非常慢。 之后会有更多说明。
当对greater子数组进行分区时,我们发现:
less:    [ 3 ]
equal:   [ 5 ]
greater: [ ]
现在我们已经完成了这层递归,因为我们无法进一步拆分数组。
重复此过程,直到所有子数组都已排序。 过程图:

现在,如果您从左到右阅读彩色框,则会获得已排序的数组:
[ -1, 0, 1, 2, 3, 5, 8, 8, 9, 10, 14, 26, 27 ]这表明8是一个很好的初始基准,因为它也出现在排好序数组的中间。
我希望这已经清楚地表明快速排序的工作原理了。 不幸的是,这个版本的快速排序不是很快,因为我们对相同的数组使用filter()三次。有更聪明的方法分割数组。
分区
围绕数据块划分数组称为 分区,并且存在一些不同的分区方案。
如果一个数组是,
[ 10, 0, 3, 9, 2, 14, 8, 27, 1, 5, 8, -1, 26 ]然后我们选择中间元素8作为一个数据块,然后分区后数组如下:
[ 0, 3, 2, 1, 5, -1, 8, 8, 10, 9, 14, 27, 26 ]
  -----------------        -----------------
  all elements < 8         all elements > 8
要实现上面操作的关键是,在分区之后,基准元素已经处于其最终排序位置。 其余的数字尚未排序,它们只是以基准数分区了。 快速排序对数组进行多次分区,直到所有值都在最终位置。
无法保证每次分区将元素保持在相同的相对顺序中,因此在使用基准“8”进行分区之后,也可能得到类似这样的内容:
[ 3, 0, 5, 2, -1, 1, 8, 8, 14, 26, 10, 27, 9 ]
唯一可以保证的是在基准元素左边是所有较小的元素,而右边是所有较大的元素。 因为分区改变相等元素的原始顺序,所以快速排序不会产生“稳定”排序(与归并排序不同)。 这大部分时间都不是什么大不了的事。
Lomuto的分区方案
在快速排序的第一个例子中,我告诉你,分区是通过调用Swift的filter()函数三次来完成的。 这不是很高效。 因此,让我们看一个更智能的分区算法,它可以 in place,即通过修改原始数组。
这是在Swift中实现Lomuto的分区方案:
func partitionLomuto<T: Comparable>(_ a: inout [T], low: Int, high: Int) -> Int {
  let pivot = a[high]

  var i = low
  for j in low..<high {
    if a[j] <= pivot {
      (a[i], a[j]) = (a[j], a[i])
      i += 1
    }
  }

  (a[i], a[high]) = (a[high], a[i])
  return i
}
在playground中测试:
var list = [ 10, 0, 3, 9, 2, 14, 26, 27, 1, 5, 8, -1, 8 ]
let p = partitionLomuto(&list, low: 0, high: list.count - 1)
list // show the results注意list需要是var,因为partitionLomuto()直接改变数组的内容(使用inout参数传递)。 这比分配新的数组对象更有效。
low和high参数是必要的,因为当在快速排序时并不一定排序整个数组,可能只是在某个区间。
以前我们使用中间数组元素作为基准,现在Lomuto方案的基准总是使用最后元素,a [high] 。 因为之前我们一直在以8作为基准,所以我在示例中交换了8和26的位置,以便8位于数组的最后并且在这里也用作枢基准。
经过Lomuto方案分区后,数组如下所示:
[ 0, 3, 2, 1, 5, 8, -1, 8, 9, 10, 14, 26, 27 ]
*变量p是partitionLomuto()的调用的返回值,是7。这是新数组中的基准元素的索引(用星号标记)。
左分区从0到p-1,是[0,3,2,1,5,8,-1]。 右分区从p + 1到结尾,并且是[9,10,14,26,27](右分区已经排序的实属是巧合)。
您可能会注意到一些有趣的东西......值8在数组中出现不止一次。 其中一个8并没有整齐地在中间,而是在左分区。 这是Lomuto算法的一个小缺点,如果存在大量重复元素,它会使快速排序变慢。
那么Lomuto算法实际上是如何工作的呢? 魔术发生在for循环中。 此循环将数组划分为四个区域:
a [low ... i]包含<= pivot的所有值a [i + 1 ... j-1]包含> pivot的所有值a [j ... high-1]是我们“未查看”的值a [high]是基准值
In ASCII art the array is divided up like this:
用ASCII字符表示,数组按如下方式划分:
[ values <= pivot | values > pivot | not looked at yet | pivot ]
low i i+1 j-1 j high-1 high循环依次查看从low到high-1的每个元素。 如果当前元素的值小于或等于基准,则使用swap将其移动到第一个区域。
注意: 在Swift中,符号(x, y) = (y, x)是在x和y的值之间执行交换的便捷方式。 你也可以使用swap(&x,&y)。
循环结束后,基准仍然是数组中的最后一个元素。 所以我们将它与第一个大于基准的元素交换。 现在,基准位于<=和>区域之间,并且数组已正确分区。
让我们逐步完成这个例子。 我们开始的数组是:
[| 10, 0, 3, 9, 2, 14, 26, 27, 1, 5, 8, -1 | 8 ]
   low                                       high
   i
   j
最初,“未查看”区域从索引0延伸到11。基准位于索引12。“values <= pivot”和“values> pivot”区域为空,因为我们还没有查看任何值。
看第一个值,10。 这比基准小吗? 不,跳到下一个元素。
[| 10 | 0, 3, 9, 2, 14, 26, 27, 1, 5, 8, -1 | 8 ]
   low                                        high
   i
       j
现在“未查看”区域从索引1到11,“values> pivot”区域包含数字“10”,“values <= pivot”仍为空。
看第二个值,0。 这比基准小吗? 是的,所以将10与0交换,然后将i向前移动一个。
[ 0 | 10 | 3, 9, 2, 14, 26, 27, 1, 5, 8, -1 | 8 ]
  low                                         high
      i
           j
现在“未查看”区域从索引2到11,“values> pivot”仍然包含“10”,“values <= pivot”包含数字“0”。
看第三个值,3。 这比基准小,所以用10换掉它得到:
[ 0, 3 | 10 | 9, 2, 14, 26, 27, 1, 5, 8, -1 | 8 ]
  low                                         high
         i
             j
“values <= pivot”区域现在是[0,3]。 让我们再做一次......9大于枢轴,所以简单地向前跳:
[ 0, 3 | 10, 9 | 2, 14, 26, 27, 1, 5, 8, -1 | 8 ]
  low                                         high
         i
                 j
现在“values> pivot”区域包含[10,9]。 如果我们继续这样做,那么我们最终会得到:
[ 0, 3, 2, 1, 5, 8, -1 | 27, 9, 10, 14, 26 | 8 ]
  low                                        high
i j最后要做的是通过将a[i]与a[high]交换来将基准放到特定位置:
[ 0, 3, 2, 1, 5, 8, -1 | 8 | 9, 10, 14, 26, 27 ]
  low                                       high
i j然后我们返回i,基准元素的索引。
** 注意:** 如果您仍然不完全清楚算法是如何工作的,我建议您在playground 试验一下,以确切了解循环如何创建这四个区域。
让我们使用这个分区方案来构建快速排序。 这是代码:
func quicksortLomuto<T: Comparable>(_ a: inout [T], low: Int, high: Int) {
  if low < high {
    let p = partitionLomuto(&a, low: low, high: high)
    quicksortLomuto(&a, low: low, high: p - 1)
    quicksortLomuto(&a, low: p + 1, high: high)
  }
}
现在这非常简单。 我们首先调用partitionLomuto()来以基准元素(它始终是数组中的最后一个元素)重新排序数组。 然后我们递归调用quicksortLomuto()来对左右分区进行排序。
试试看:
var list = [ 10, 0, 3, 9, 2, 14, 26, 27, 1, 5, 8, -1, 8 ]
quicksortLomuto(&list, low: 0, high: list.count - 1)
Lomuto方案不是唯一的分区方案,但它可能是最容易理解的。 它不如Hoare的方案有效,后者需要的交换操作更少。
Hoare的分区方案
这种分区方案是由快速排序的发明者Hoare完成的。
下面是代码:
func partitionHoare<T: Comparable>(_ a: inout [T], low: Int, high: Int) -> Int {
  let pivot = a[low]
  var i = low - 1
  var j = high + 1

  while true {
    repeat { j -= 1 } while a[j] > pivot
    repeat { i += 1 } while a[i] < pivot

    if i < j {
      a.swapAt(i, j)
    } else {
      return j
    }
  }
}
在playground中测试:
var list = [ 8, 0, 3, 9, 2, 14, 10, 27, 1, 5, 8, -1, 26 ]
let p = partitionHoare(&list, low: 0, high: list.count - 1)
list  // show the results
注意,使用Hoare的方案,基准总是数组中的 first 元素,a [low]。 同样,我们使用8作为基准元素。
结果是:
[ -1, 0, 3, 8, 2, 5, 1, 27, 10, 14, 9, 8, 26 ]请注意,这次基准根本不在中间。 与Lomuto的方案不同,返回值不一定是新数组中基准元素的索引。
结果,数组被划分为区域[low ... p]和[p + 1 ... high]。 这里,返回值p是6,因此两个分区是[-1,0,3,8,2,5,1]和[27,10,14,9,8,26]。
由于存在这些差异,Hoare快速排序的实施略有不同:
func quicksortHoare<T: Comparable>(_ a: inout [T], low: Int, high: Int) {
  if low < high {
    let p = partitionHoare(&a, low: low, high: high)
    quicksortHoare(&a, low: low, high: p)
    quicksortHoare(&a, low: p + 1, high: high)
  }
}
Hoare的分区方案是如何工作的?我将把它作为练习让读者自己弄清楚。:-)
选择一个好的基准
Lomuto的分区方案总是为基准选择最后一个数组元素。 Hoare的分区方案使用第一个元素。 但这都不能保证这些基准是好的。
以下是为基准选择错误值时会发生的情况。 如果一个数组是:
[ 7, 6, 5, 4, 3, 2, 1 ]我们使用Lomuto的方案。 基准是最后一个元素,1。 分区后:
   less than pivot: [ ]
    equal to pivot: [ 1 ]
greater than pivot: [ 7, 6, 5, 4, 3, 2 ]
现在以递归方式对“更大的”子数组进行分区,得到:
   less than pivot: [ ]
    equal to pivot: [ 2 ]
greater than pivot: [ 7, 6, 5, 4, 3 ]
再次:
   less than pivot: [ ]
    equal to pivot: [ 3 ]
greater than pivot: [ 7, 6, 5, 4 ]
等等。。。
这并不好,因为这样的快速排序可能比插入排序更慢。 为了使快速排序高效,需要将数组分成两个大约相等的部分。
这个例子的最佳基准是4,所以我们得到:
   less than pivot: [ 3, 2, 1 ]
    equal to pivot: [ 4 ]
greater than pivot: [ 7, 6, 5 ]
您可能认为这意味着我们应该始终选择中间元素而不是第一个或最后一个,但想象在以下情况下会发生什么:
[ 7, 6, 5, 1, 4, 3, 2 ]现在,中间元素是1,它给出了与前一个例子相同的糟糕结果。
理想情况下,基准是您要分区的数组的 中位数(译注:大小在中间的) 元素,即位于排玩序数组中间的元素。当然,在你对数组进行排序之前,你不会知道中位数是什么,所以这就回到 鸡蛋和鸡 问题了。然而,有一些技巧可以改进。
一个技巧是“三个中间值”,您可以在找到数组中第一个,中间和最后一个的中位数。 从理论上讲,这通常可以很好地接近真实的中位数。
另一种常见的解决方案是随机选择基准。 有时这可能会选择次优的基准,但平均而言,这会产生非常好的结果。
以下是如何使用随机选择的基准进行快速排序:
func quicksortRandom<T: Comparable>(_ a: inout [T], low: Int, high: Int) {
  if low < high {
    let pivotIndex = random(min: low, max: high)         // 1

    (a[pivotIndex], a[high]) = (a[high], a[pivotIndex])  // 2

    let p = partitionLomuto(&a, low: low, high: high)
    quicksortRandom(&a, low: low, high: p - 1)
    quicksortRandom(&a, low: p + 1, high: high)
  }
}
与之前有两个重要的区别:
random(min:max:)函数返回min...max范围内的整数,这是我们基准的索引。因为Lomuto方案期望
a[high]成为基准,我们将a[pivotIndex]与a[high]交换,将基准元素放在末尾,然后再调用partitionLomuto()。
在类似排序函数中使用随机数似乎很奇怪,但让快速排序在所有情况下都能有效地运行,这是有必要的。 坏的基准,快速排序的表现可能非常糟糕,O(n^2)。 但是如果平均选择好的基准,例如使用随机数生成器,预期的运行时间将变为O(nlogn),这是好的排序算法。
荷兰国旗??分区
还有更多改进! 在我向您展示的第一个快速排序示例中,我们最终得到了一个像这样分区的数组:
[ values < pivot | values equal to pivot | values > pivot ]但是正如您在Lomuto分区方案中看到的那样,如果多次出现基准元素,则重复项最后会在左分区。 而通过Hoare方案,重复基准元素可以遍布任意分区。 解决这个问题的方法是“荷兰国旗”分区,以荷兰国旗有三个频段命名,就像我们想拥有三个分区一样。
该方案的代码是:
func partitionDutchFlag<T: Comparable>(_ a: inout [T], low: Int, high: Int, pivotIndex: Int) -> (Int, Int) {
  let pivot = a[pivotIndex]

  var smaller = low
  var equal = low
  var larger = high

  while equal <= larger {
    if a[equal] < pivot {
      swap(&a, smaller, equal)
      smaller += 1
      equal += 1
    } else if a[equal] == pivot {
      equal += 1
    } else {
      swap(&a, equal, larger)
      larger -= 1
    }
  }
  return (smaller, larger)
}
这与Lomuto方案的工作方式非常相似,只是循环将数组划分为四个(可能为空)区域:
[low ... smaller-1]包含< pivot的所有值[less ... equal-1]包含== pivot的所有值[equal ... larger]包含> pivot的所有值[large ... high]是我们“未查看”的值
Note that this doesn't assume the pivot is in a[high]. Instead, you have to pass in the index of the element you wish to use as a pivot.
请注意,这并不假设基准处于a[high]。 而是,必须传入要用作基准的元素的索引。
如何使用它的一个例子:
var list = [ 10, 0, 3, 9, 2, 14, 8, 27, 1, 5, 8, -1, 26 ]
partitionDutchFlag(&list, low: 0, high: list.count - 1, pivotIndex: 10)
list // show the results只是为了好玩,我们这次给它的另一个8的索引。 结果是:
[ -1, 0, 3, 2, 5, 1, 8, 8, 27, 14, 9, 26, 10 ]注意两个8现在是如何在中间的。 partitionDutchFlag()的返回值是一个元组,(6,7)。 这是包含基准的范围。
以下是如何在快速排序中使用它:
func quicksortDutchFlag<T: Comparable>(_ a: inout [T], low: Int, high: Int) {
  if low < high {
    let pivotIndex = random(min: low, max: high)
    let (p, q) = partitionDutchFlag(&a, low: low, high: high, pivotIndex: pivotIndex)
    quicksortDutchFlag(&a, low: low, high: p - 1)
    quicksortDutchFlag(&a, low: q + 1, high: high)
  }
}
如果数组包含许多重复元素,则使用荷兰国旗分区可以提高效率。 (而且我不只是这么说,因为我是荷兰人!)
注意:partitionDutchFlag()的上述实现使用自定义swap()来交换两个数组元素的内容。 与Swift自带的swapAt()不同,当两个索引引用相同的数组元素时,这不会产生错误。public func swap<T>(_ a: inout [T], _ i: Int, _ j: Int) { if i != j { a.swapAt(i, j) } }
扩展阅读
# 归并排序(Merge Sort)这个主题已经有辅导文章
目标:将数组从低到高(或从高到低)排序
归并排序是1945年由John von Neumann发明的,是一种有效的算法,最佳、最差和平均时间复杂度都是O(n log n)。
归并排序算法使用分而治之方法,即将一个大问题分解为较小的问题并解决它们。 归并排序算法可分为 先拆分 和 后合并。
假设您需要按正确的顺序对长度为 n 的数组进行排序。 归并排序算法的工作原理如下:
将数字放在未排序的堆中。
将堆分成两部分。 那么现在就有两个未排序的数字堆。
继续分裂两个未排序的数字堆,直到你不能分裂为止。 最后,你将拥有 n 个堆,每堆中有一个数字。
通过顺序配对,开始 合并 堆。 在每次合并期间,将内容按排序顺序排列。 这很容易,因为每个单独的堆已经排序(译注:单个数字没有所谓的顺序,就是排好序的)。
例子
拆分
假设给你一个长度为n的未排序数组:[2,1,5,4,9]。 目标是不断拆分堆,直到你不能拆分为止。
首先,将数组分成两半:[2,1]和[5,4,9]。 你能继续拆分吗? 是的你可以!
专注于左边堆。 将[2,1]拆分为[2]和[1]。 你能继续拆分吗? 不能了。检查右边的堆。
将[5,4,9]拆分为[5]和[4,9]。 不出所料,[5]不能再拆分了,但是[4,9]可以分成[4]和[9]。
拆分最终结果为:[2][1][5][4][9]。 请注意,每个堆只包含一个元素。
合并
您已经拆分了数组,您现在应该 合并并排序 拆分后的堆。 请记住,这个想法是解决许多小问题而不是一个大问题。 对于每次合并迭代,您必须关注将一堆与另一堆合并。
对于堆 [2] [1] [5] [4] [9],第一次合并的结果是[1,2]和[4,5] 和[9]。 由于[9]的位置落单,所以在合并过程中没有堆与之合并了。
下一次将合并[1,2]和[4,5]。 结果[1,2,4,5],再次由于[9]的位置落单不需要合并。
只剩下两堆[1,2,4,5]和[9],合并后完成排序的数组为[1,2,4,5,9]。
自上而下的实施(递归法)
归并排序的Swift实现:
func mergeSort(_ array: [Int]) -> [Int] {
  guard array.count > 1 else { return array }    // 1

  let middleIndex = array.count / 2              // 2

  let leftArray = mergeSort(Array(array[0..<middleIndex]))             // 3

  let rightArray = mergeSort(Array(array[middleIndex..<array.count]))  // 4

  return merge(leftPile: leftArray, rightPile: rightArray)             // 5
}
代码的逐步说明:
如果数组为空或包含单个元素,则无法将其拆分为更小的部分,返回数组就行。
找到中间索引。
使用上一步中的中间索引,递归地分割数组的左侧。
此外,递归地分割数组的右侧。
最后,将所有值合并在一起,确保它始终排序。
这儿是合并的算法:
func merge(leftPile: [Int], rightPile: [Int]) -> [Int] {
  // 1
  var leftIndex = 0
  var rightIndex = 0

  // 2
  var orderedPile = [Int]()

  // 3
  while leftIndex < leftPile.count && rightIndex < rightPile.count {
    if leftPile[leftIndex] < rightPile[rightIndex] {
      orderedPile.append(leftPile[leftIndex])
      leftIndex += 1
    } else if leftPile[leftIndex] > rightPile[rightIndex] {
      orderedPile.append(rightPile[rightIndex])
      rightIndex += 1
    } else {
      orderedPile.append(leftPile[leftIndex])
      leftIndex += 1
      orderedPile.append(rightPile[rightIndex])
      rightIndex += 1
    }
  }

  // 4
  while leftIndex < leftPile.count {
    orderedPile.append(leftPile[leftIndex])
    leftIndex += 1
  }

  while rightIndex < rightPile.count {
    orderedPile.append(rightPile[rightIndex])
    rightIndex += 1
  }

  return orderedPile
}
这种方法可能看起来很可怕,但它非常简单:
在合并时,您需要两个索引来跟踪两个数组的进度。
这是合并后的数组。 它现在是空的,但是你将在下面的步骤中通过添加其他数组中的元素构建它。
这个while循环将比较左侧和右侧的元素,并将它们添加到
orderedPile,同时确保结果保持有序。如果前一个while循环完成,则意味着
leftPile或rightPile中的一个的内容已经完全合并到orderedPile中。此时,您不再需要进行比较。只需依次添加剩下一个数组的其余内容到orderedPile。
merge()函数如何工作的例子。假设我们有以两个个堆:leftPile = [1,7,8]和rightPile = [3,6,9]。 请注意,这两个堆都已单独排序 -- 合并排序总是如此的。 下面的步骤就将它们合并为一个更大的排好序的堆:
  leftPile       rightPile       orderedPile
  [ 1, 7, 8 ]    [ 3, 6, 9 ]     [ ]
l r左侧索引(此处表示为l)指向左侧堆的第一个项目1。 右则索引r指向3。 因此,我们添加到orderedPile的第一项是1。 我们还将左侧索引l移动到下一个项。
  leftPile       rightPile       orderedPile
  [ 1, 7, 8 ]    [ 3, 6, 9 ]     [ 1 ]
-->l r现在l指向7但是r仍然处于3。 我们将最小的项3添加到有序堆中。 现在的情况是:
  leftPile       rightPile       orderedPile
  [ 1, 7, 8 ]    [ 3, 6, 9 ]     [ 1, 3 ]
       l           -->r
重复上面的过程。 在每一步中,我们从leftPile或rightPile中选择最小的项,并将该项添加到orderedPile中:
  leftPile       rightPile       orderedPile
  [ 1, 7, 8 ]    [ 3, 6, 9 ]     [ 1, 3, 6 ]
       l              -->r

  leftPile       rightPile       orderedPile
  [ 1, 7, 8 ]    [ 3, 6, 9 ]     [ 1, 3, 6, 7 ]
       -->l              r

  leftPile       rightPile       orderedPile
  [ 1, 7, 8 ]    [ 3, 6, 9 ]     [ 1, 3, 6, 7, 8 ]
          -->l           r
现在,左堆中没有更多物品了。 我们只需从右边的堆中添加剩余的项目,我们就完成了。 合并的堆是[1,3,6,7,8,9]。
请注意,此算法非常简单:它从左向右移动通过两个堆,并在每个步骤选择最小的项目。 这是有效的,因为我们保证每个堆都已经排序。
译注: 关于自上而下的执行(递归法)的归并排序,我找了一个比较形象的动图,来源

自下而上的实施(迭代)
到目前为止你看到的合并排序算法的实现被称为“自上而下”的方法,因为它首先将数组拆分成更小的堆然后合并它们。排序数组(而不是链表)时,实际上可以跳过拆分步骤并立即开始合并各个数组元素。 这被称为“自下而上”的方法。
下面是Swift中一个完整的自下而上的实现:
func mergeSortBottomUp<T>(_ a: [T], _ isOrderedBefore: (T, T) -> Bool) -> [T] {
  let n = a.count

  var z = [a, a]      // 1
  var d = 0

  var width = 1
  while width < n {   // 2

    var i = 0
    while i < n {     // 3

      var j = i
      var l = i
      var r = i + width

      let lmax = min(l + width, n)
      let rmax = min(r + width, n)

      while l < lmax && r < rmax {                // 4
        if isOrderedBefore(z[d][l], z[d][r]) {
          z[1 - d][j] = z[d][l]
          l += 1
        } else {
          z[1 - d][j] = z[d][r]
          r += 1
        }
        j += 1
      }
      while l < lmax {
        z[1 - d][j] = z[d][l]
        j += 1
        l += 1
      }
      while r < rmax {
        z[1 - d][j] = z[d][r]
        j += 1
        r += 1
      }

      i += width*2
    }

    width *= 2
    d = 1 - d      // 5
  }
  return z[d]
}它看起来比自上而下的版本更令人生畏,但请注意主体包含与merge()相同的三个while循环。
值得注意的要点:
归并排序算法需要一个临时工作数组,因为你不能合并左右堆并同时覆盖它们的内容。 因为为每个合并分配一个新数组是浪费,我们使用两个工作数组,我们将使用
d的值在它们之间切换,它是0或1。数组z[d]用于读,z[1 - d]用于写。 这称为 双缓冲。从概念上讲,自下而上版本的工作方式与自上而下版本相同。首先,它合并每个元素的小堆,然后它合并每个堆两个元素,然后每个堆成四个元素,依此类推。堆的大小由
width给出。 最初,width是1但是在每次循环迭代结束时,我们将它乘以2,所以这个外循环确定要合并的堆的大小,并且要合并的子数组在每一步中变得更大。内循环穿过堆并将每对堆合并成一个较大的堆。 结果写在
z[1 - d]给出的数组中。这与自上而下版本的逻辑相同。 主要区别在于我们使用双缓冲,因此从
z[d]读取值并写入z [1 - d]。它还使用isOrderedBefore函数来比较元素而不仅仅是<,因此这种合并排序算法是通用的,您可以使用它来对任何类型的对象进行排序。此时,数组
z[d]的大小width的堆已经合并为数组z[1-d]中更大的大小width * 2。在这里,我们交换活动数组,以便在下一步中我们将从我们刚刚创建的新堆中读取。
这个函数是通用的,所以你可以使用它来对你想要的任何类型对象进行排序,只要你提供一个正确的isOrderedBefore闭包来比较元素。
怎么使用它的示例:
let array = [2, 1, 5, 4, 9]
mergeSortBottomUp(array, <) // [1, 2, 4, 5, 9]译注:关于迭代的归并排序,我找到一个图来表示,来源

性能
归并排序算法的速度取决于它需要排序的数组的大小。 数组越大,它需要做的工作就越多。
初始数组是否已经排序不会影响归并排序算法的速度,因为无论元素的初始顺序如何,您都将进行相同数量的拆分和比较。
因此,最佳,最差和平均情况的时间复杂度将始终为 O(n log n)。
归并排序算法的一个缺点是它需要一个临时的“工作”数组,其大小与被排序的数组相同。 它不是原地排序,不像例如quicksort。
大多数实现归并排序算法是稳定的排序。这意味着具有相同排序键的数组元素在排序后将保持相对于彼此的相同顺序。这对于数字或字符串等简单值并不重要,但在排序更复杂的对象时,如果不是稳定的排序可能会出现问题。
译注:当元素相同时,排序后依然保持排序之前的相对顺序,那么这个排序算法就是稳定的。稳定的排序有:插入排序、计数排序、归并排序、基数排序等等,详见穩定的排序。
扩展阅读
堆排序(Heap Sort)
使用堆将数组从低到高排序。( 译注: 也可以从高到低排序)
堆是一个部分排序的二叉树,存储在数组中。 堆排序算法利用堆的结构来执行快速排序。
要从最低到最高排序,堆排序首先将未排序的数组转换为max-heap,让数组中的第一个元素是最大的。
假设,需要排序的数组为:
[ 5, 13, 2, 25, 7, 17, 20, 8, 4 ]首先变成了一个如下所示的max-heap:
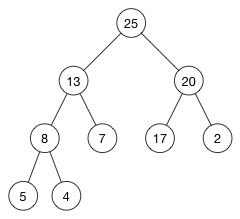
这个堆的数组是:
[ 25, 13, 20, 8, 7, 17, 2, 5, 4 ]这几乎不是想要的从低到高排序!
现在开始排序:我们将第一个元素(索引0)与索引n-1的最后一个元素交换,得到:
[ 4, 13, 20, 8, 7, 17, 2, 5, 25 ]
* *现在新的根节点4小于其子节点,因此我们使用shift down或“堆化(heapify)”将0到n-2元素修复成max-heap。 修复堆后,新的根节点现在是数组中的第二大项:
[20, 13, 17, 8, 7, 4, 2, 5 | 25]重要提示:当我们修复堆时,我们忽略索引为n-1的最后一项。 最后一项是数组中的最大值,因此它已经在最终排序的位置了。 |栏表示数组的已排序部分的开始位置。 从现在开始,我们将单独除了数组余下的部分(|前面的部分)。
同样,我们将第一个元素与最后一个元素交换(这次是在索引n-2):
[5, 13, 17, 8, 7, 4, 2, 20 | 25]
* *并修复堆以使其再次成为有效的max-heap:
[17, 13, 5, 8, 7, 4, 2 | 20, 25]正如您所看到的,最大项正在向后移动。 我们重复这个过程,直到到达根节点,也就对整个数组进行了排序。
注意: 此过程与选择排序 非常相似,它重复查找数组其余部分中的最小项。 提取最小值或最大值是堆擅长做的。
堆排序的性能最佳,最差和平均情况下都是O(n lg n)。 因为我们直接修改数组,所以可以就地执行堆排序。 但它不是一个稳定的类型:不保留相同元素的相对顺序。
以下是在Swift中实现堆排序的方法:
extension Heap {
  public mutating func sort() -> [T] {
    for i in stride(from: (elements.count - 1), through: 1, by: -1) {
      swap(&elements[0], &elements[i])
      shiftDown(0, heapSize: i)
    }
    return elements
  }
}为堆实现添加了一个sort()函数。 这个函数的使用方式:
var h1 = Heap(array: [5, 13, 2, 25, 7, 17, 20, 8, 4], sort: >)
let a1 = h1.sort()因为我们需要一个max-heap来从低到高排序,你需要给Heap提供sort函数的反向排序。 要对<进行排序,必须使用>作为sort函数创建Heap对象。 换句话说,从低到高的排序会创建一个max-heap并将其转换为min-heap( 译注: 这边的意思就是排完序以后就变成了一个从小到大的特殊的min-heap)。
我们可以为此编写一个方便的辅助函数:
public func heapsort<T>(_ a: [T], _ sort: @escaping (T, T) -> Bool) -> [T] {
  let reverseOrder = { i1, i2 in sort(i2, i1) }
  var h = Heap(array: a, sort: reverseOrder)
  return h.sort()
}
使用方式:
let a2 = heapsort([5, 13, 2, 25, 7, 17, 20, 8, 4], <)
print(a2)
内省排序(IntroSort)
目标:将数组从低到高(或从高到低)排序。
IntroSort is the algorithm used by swift to sort a collection. Introsort is an hybrid algorithm invented by David Musser in 1993 with the purpose of giving a generic sorting algorithm for the C++ standard library. The classic implementation of introsort expect a recursive Quicksort with fallback to Heapsort in case the recursion depth level reached a certain max. The maximum depends on the number of elements in the collection and it is usually 2 * log(n).
The reason behind this “fallback” is that if Quicksort was not able to get the solution after 2 * log(n) recursions for a branch, probably it hit its worst case and it is degrading to complexity O( n^2 ). To optimise even further this algorithm, the swift implementation introduce an extra step in each recursion where the partition is sorted using InsertionSort if the count of the partition is less than 20.
内省排序是用于对集合进行迅速排序的算法。 内省排序是David Musser在1997( 译注: 原文是1993,应为1997)年发明的一种混合算法,目的是为C ++标准库提供通用的排序算法。 内省排序首先从 快速排序 开始,当递归深度达到某个最大值后转为堆排序 ,最大值取决于集合中元素的数量,通常为 2 * log(n) 。
这种“后退”背后的原因是,如果快速排序在分支的 2 * log(n) 递归之后无法得到解决方案,可能遇到了最坏的情况,复杂度降到 O(n^2) 。 为了进一步优化该算法,迅速实现在每次递归中引入了额外的步骤,其中如果分区的计数小于20,则使用插入排序对分区进行排序。
The number 20 is an empiric number obtained observing the behaviour of InsertionSort with lists of this size.
数字20是一个经验数字,它使用此大小的列表观察InsertionSort的行为。
伪代码的实现:
procedure sort(A : array):
    let maxdepth = ⌊log(length(A))⌋ × 2
    introSort(A, maxdepth)

procedure introsort(A, maxdepth):
    n ← length(A)
    if n < 20:
        insertionsort(A)
    else if maxdepth = 0:
        heapsort(A)
    else:
        p ← partition(A)  // the pivot is selected using median of 3
        introsort(A[0:p], maxdepth - 1)
        introsort(A[p+1:n], maxdepth - 1)
例子
Let's walk through the example. The array is initially:
让我们来看看这个例子。 开始数组是:
[ 10, 0, 3, 9, 2, 14, 8, 27, 1, 5, 8, -1, 26 ]For this example let's assume that maxDepth is 2 and that the size of the partition for the insertionSort to kick in is 5
对于这个例子,我们假设maxDepth是 2 并且要插入的插入排序分区的大小是5
The first iteration of introsort begins by attempting to use insertionSort. The collection has 13 elements, so it tries to do heapsort instead. The condition for heapsort to occur is if maxdepth == 0 evaluates true. Since maxdepth is currently 2 for the first iteration, introsort will default to quicksort.
内省排序的第一次迭代从尝试使用插入排序开始。 该集合有13个元素,因此它尝试进行堆排序。 发生堆的条件是maxdepth == 0评估为真。 由于maxdepth在第一次迭代中目前是2,因此内省排序将默认为快速排序。
The partition method picks the first element, the median and the last, it sorts them and uses the new median as pivot.partition方法选择第一个元素,中间值和最后一个元素,它对它们进行排序并使用新的中位数作为基准。
[ 10, 8, 26 ] -> [ 8, 10, 26 ]Our array is now
现在数组是:
[ 8, 0, 3, 9, 2, 14, 10, 27, 1, 5, 8, -1, 26 ]10 is the pivot. After the choice of the pivot, the partition method swaps elements to get all the elements less than pivot on the left, and all the elements more or equal than pivot on the right.
10是基准。 在选择了基准之后,partition方法交换元素以使所有元素在左边小于基准,并且所有元素大于或等于右边的基准。
[ 8, 0, 3, 9, 2, 1, 5, 8, -1, 10, 27, 14, 26 ]Because of the swaps, the index of of pivot is now changed and returned. The next step of introsort is to call recursively itself for the two sub arrays:
由于交换,现在更改并返回数据基准的索引。 内省排序的下一步是为两个子数组递归调用:
less: [ 8, 0, 3, 9, 2, 1, 5, 8, -1, 10 ]
greater: [ 27, 14, 26 ]
maxDepth: 1, branch: less
[ 8, 0, 3, 9, 2, 1, 5, 8, -1, 10 ]The count of the array is still more than 5 so we don't meet yet the conditions for insertion sort to kick in. At this iteration maxDepth is decreased by one but it is still more than zero, so heapsort will not act.
数组的计数仍然超过5,所以我们还没有满足插入排序的条件。在这次迭代中,maxDepth减少了一个但仍然大于零,所以堆排序不会动作。
Just like in the previous iteration quicksort wins and the partition method choses a pivot and sorts the elemets less than pivot on the left and the elements more or equeal than pivot on the right.
就像在上一次迭代中一样,快速排序获胜并且partition方法选择一个数据透视表并对左边的元素进行排序,而对元素进行排序,元素比右边的数据更多或更有效。
array: [ 8, 0, 3, 9, 2, 1, 5, 8, -1, 10 ]
pivot candidates: [ 8, 1, 10] -> [ 1, 8, 10]
pivot: 8
before partition: [ 1, 0, 3, 9, 2, 8, 5, 8, -1, 10 ]
after partition: [ 1, 0, 3, -1, 2, 5, 8, 8, 9, 10 ]

less: [ 1, 0, 3, -1, 2, 5, 8 ]
greater: [ 8, 9, 10 ]
maxDepth: 0, branch: less
[ 1, 0, 3, -1, 2, 5, 8 ]Just like before, introsort is recursively executed for less and greater. This time lesshas a count more than 5 so it will not be sorted with insertion sort, but the maxDepth decreased again by 1 is now 0 and heapsort takes over sorting the array.
就像以前一样,内省排序以递减的方式执行“less”和更多。这次less的计数超过5所以它不会按插入排序排序,但maxDepth再次减少1现在为0,而heapsort接管排序数组。
heapsort -> [ -1, 0, 1, 2, 3, 5, 8 ]
maxDepth: 0, branch: greater
[ 8, 9, 10 ]following greater in this recursion, the count of elements is 3, which is less than 5, so this partition is sorted using insertionSort.
在此递归中,如果更大,则元素的数量为3,小于5,因此使用insertionSort对此分区进行排序。
insertionSort -> [ 8, 9 , 10]
back to maxDepth = 1, branch: greater
[ 27, 14, 26 ]At this point the original array has mutated to be
此时原始数组已经变为
[ -1, 0, 1, 2, 3, 5, 8, 8, 9, 10, 27, 14, 26 ]now the less partition is sorted and since the count of the greater partition is 3 it will be sorted with insertion sort [ 14, 26, 27 ]
现在less分区被排序,因为more分区的计数是3,它将按插入排序[14,26,27]进行排序。
The array is now successfully sorted
数组被成功排序:
[ -1, 0, 1, 2, 3, 5, 8, 8, 9, 10, 14, 26, 27 ]
扩展阅读
内省排序的维基百科
内省排序与其它排序算法的比较
内省排序在Swift标准库中的实现
计数排序(Counting Sort)
Counting sort is an algorithm for sorting a collection of objects according to keys that are small integers. It operates by counting the number of objects that have each distinct key values, and using arithmetic on those counts to determine the positions of each key value in the output sequence.
计数排序是一种根据小整数键对对象集合进行排序的算法。通过计算具有每个不同键值的对象的数量来操作,并对这些计数使用算术来确定输出序列中每个键值的位置。
例子
为了理解算法,让我们来看一个小例子。
考虑数组: [ 10, 9, 8, 7, 1, 2, 7, 3 ]
第一步:
第一步是计算数组中每个项的总出现次数。 第一步的输出将是一个新的数组,如下所示:
Index 0 1 2 3 4 5 6 7 8 9 10
Count 0 1 1 1 0 0 0 2 1 1 1
译注: 这边Index的最大值对应于,数组中最大值10。
这是完成第一步的代码:
  let maxElement = array.max() ?? 0

  var countArray = [Int](repeating: 0, count: Int(maxElement + 1))
  for element in array {
    countArray[element] += 1
  }
第二步:
在此步骤中,算法尝试确定在每个元素之前放置的元素的数量。通过第一步已经知道每个元素的总出现次数,可以得到。方法就是把前一个计数和当前计数相加存储到每个索引中(对应代码就是countArray[index] + countArray[index - 1])。
计数数组如下:
Index 0 1 2 3 4 5 6 7 8 9 10
Count 0 1 2 3 3 3 3 5 6 7 8
第二步的代码:
  for index in 1 ..< countArray.count {
    let sum = countArray[index] + countArray[index - 1]
    countArray[index] = sum
  }
第三步
这是算法的最后一步。 原始数组中的每个元素都放置在第二步的输出定义的位置。例如,数字10将放在输出数组中的索引7处。 此外,当您放置元素时,您需要将计数减少1,因为从数组中减少了许多元素。
最终的输出是:
Index  0 1 2 3 4 5 6 7
Output 1 2 3 7 7 8 9 10
以下是最后一步的代码:
  var sortedArray = [Int](repeating: 0, count: array.count)
  for element in array {
    countArray[element] -= 1
    sortedArray[countArray[element]] = element
  }
  return sortedArray
性能
该算法使用简单循环对集合进行排序。 因此,运行整个算法的时间是O(n+k)其中O(n)表示初始化输出数组所需的循环,O(k)是创建计数数组所需的循环。
该算法使用长度为n + 1和n的数组,因此所需的总空间为O(2n)。 因此,对于密钥沿着数字线分散在密集区域中的集合,它可以节省空间。
作者:Ali Hafizji
翻译:Andy Ron
校对:Andy Ron
翻译后补充
计数排序假设n个输入元素中的每一个都是在0到k区间内的一个整数,其中k为某个整数。当k=O(n)时,排序的运行时间为Θ(n)。
计数排序的思想是,对每一个输入元素,计算小于它的元素个数,如果有10个元素小于它,那么它就应该放在11的位置上,如果有17个元素小于它,它就应该放在18的位置上。当有几个元素相同时,这一方案要略做修改,因为不能把它们放在同一个输出位置上。下图(来源于《算法导论》)展示了实际的运行过程。

构造辅助数组C,C的长度为k。第一次遍历A后,得到[0,k)区间上每个数出现的次数,将这些次数写入C,得到图(a)的结果。然后把C中每个元素变成前面所有元素的累加和,得到图(b)的结果。接下来,再次从后向前遍历数组A,根据取出的元素查找C中对应下标的值,再把这个值作为下标找到B中的位置,即是该元素排序后的位置。例如,图中A的最后一个元素是3,找到C[3]是7,再令B[7]=3即可,然后顺便把C[3]减一,这是防止相同的数被放到同一个位置。
计数排序的时间代价可以这样计算,第一次遍历A并计算C所花时间是Θ(n),C累加所花时间是Θ(k),再次遍历A并给B赋值所花时间是Θ(n),因此,总时间为Θ(k + n)。在实际中,当k=O(n)时,我们一般会采用计数排序,这时的运行时间为Θ(n)。
参考
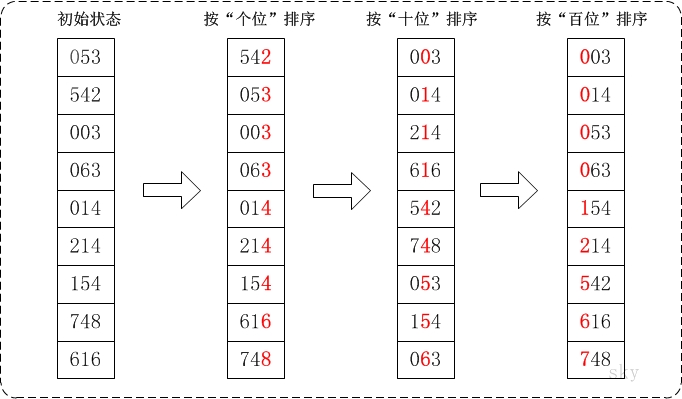
基数排序(Radix Sort)
基数排序是一种排序算法,它将整数数组作为输入,并使用排序子程序(通常是另一种有效的排序算法)来按整数基数或者它们的数字对整数进行排序。 Counting Sort和Bucket Sort通常用作Radix Sort的子程序。
例子
Input Array: [170, 45, 75, 90, 802, 24, 2, 66]
Output Array (Sorted): [2, 24, 45, 66, 75, 90, 170, 802]
第一步:
此算法的第一步是定义数字,或者更确切地说是我们将用于排序的“base”或基数。
对于这个例子,我们将radix = 10,因为我们在示例中使用的整数是基数10。
第二步:
下一步是简单地迭代n次(其中n是输入数组中最大整数中的位数),并且在每次迭代时对当前数字执行排序子程序。
算法中的行动
我们来看看我们的示例输入数组。
我们数组中的最大整数是802,它有三位数(一,十,百)。 因此,我们的算法将迭代三次,同时对每个整数的数字执行一些排序算法。
Iteration 1: 170, 90, 802, 2, 24, 45, 75, 66
Iteration 2: 802, 2, 24, 45, 66, 170, 75, 90
Iteration 3: 2, 24, 45, 66, 75, 90, 170, 802
代码
import Foundation

// 不能处理负数
public func radixSort(_ array: inout [Int]) {
    let radix = 10
    var done = false
    var index: Int
    var digit = 1

    while !done {
        done = true

        var buckets: [[Int]] = []  // 我们的排序子程序是桶排序,所以让我们预定义我们的桶

        for _ in 1...radix {
            buckets.append([])
        }

        for number in array {
            index = number / digit
            buckets[index % radix].append(number)
            if done && index > 0 {
                done = false
            }
        }

        var i = 0

        for j in 0..<radix {
            let bucket = buckets[j]
            for number in bucket {
                array[i] = number
                i += 1
            }
        }

        digit *= radix
    }
}

// 小数组的测试
var array: [Int] = [19, 4242, 2, 9, 912, 101, 55, 67, 89, 32]
radixSort(&array)
print(array)

// 大数组的测试
var bigArray = [Int](repeating: 0, count: 1000)
var i = 0
while i < 100 {
    bigArray[i] = Int(arc4random_uniform(1000) + 1)
    i += 1
}
radixSort(&bigArray)
print(bigArray)
更多查看 基数排序的维基百科
基数排序的中文维基百科
作者:Christian Encarnacion
翻译:Andy Ron
校对:Andy Ron
翻译后补充
基数排序对数组[53, 3, 542, 748, 14, 214, 154, 63, 616]的排序,示意图(来源:www.cnblogs.com/skyw...) 说明:
拓扑排序(Topological Sort)
Topological sort is an algorithm that orders a directed graph such that for each directed edge u→v, vertex u comes before vertex v.
拓扑排序是一种对有向图进行排序的算法,使得对于每个有向边u→v,顶点u在顶点v之前。
In other words, a topological sort places the vertices of a directed acyclic graph on a line so that all directed edges go from left to right.
换句话说,拓扑排序将有向无环图的顶点放在一条直线上,以便所有有向边从左到右。
Consider the graph in the following example:
请考虑以下示例中的图表:
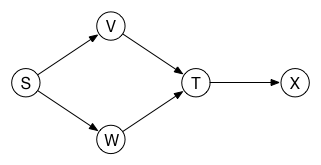
This graph has two possible topological sorts:
该图有两种可能的拓扑排序:

The topological orderings are S, V, W, T, X and S, W, V, T, X. Notice how the arrows all go from left to right.
拓扑排序是 S, V, W, T, X 和 S, W, V, T, X。 注意箭头是如何从左到右的。
The following is not a valid topological sort for this graph, since X and T cannot happen before V:
以下不是该图的有效拓扑排序,因为X和T不能在V之前发生:

Where is this used?
在哪里使用?
Let's consider that you want to learn all the algorithms and data structures from the Swift Algorithm Club. This might seem daunting at first but we can use topological sort to get things organized.
让我们考虑一下你想要学习Swift算法俱乐部的所有算法和数据结构。 这可能看起来令人生畏,但我们可以使用拓扑排序来使事情井井有条。
Since you're learning about topological sort, let's take this topic as an example. What else do you need to learn first before you can fully understand topological sort? Well, topological sort uses depth-first search as well as a stack. But before you can learn about the depth-first search algorithm, you need to know what a graph is, and it helps to know what a tree is. In turn, graphs and trees use the idea of linking objects together, so you may need to read up on that first. And so on...
由于您正在学习拓扑排序,我们以此主题为例。 在完全理解拓扑排序之前,您还需要先学习什么? 拓扑排序使用深度优先搜索以及[stack](../ Stack/)。 但在你了解深度优先搜索算法之前,你需要知道graph是什么,它有助于知道tree是什么。 反过来,图形和树使用将对象链接在一起的想法,因此您可能需要首先阅读。 等等...
If we were to represent these objectives in the form of a graph it would look as follows:
如果我们以图表的形式表示这些目标,它将如下所示:
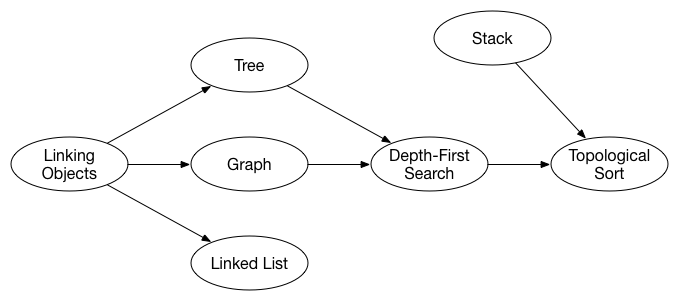
If we consider each algorithm to be a vertex in the graph you can clearly see the dependencies between them. To learn something you might have to know something else first. This is exactly what topological sort is used for -- it will sort things out so that you know what to do first.
如果我们将每个算法视为图中的顶点,您可以清楚地看到它们之间的依赖关系。 要学习一些东西,你可能必须先了解别的东西。 这正是拓扑排序的用途 - 它将对事情进行排序,以便您首先知道要做什么。
How does it work?
它是如何工作的?
Step 1: Find all vertices that have in-degree of 0
步骤1:查找度数为0的所有顶点
The in-degree of a vertex is the number of edges pointing at that vertex. Vertices with no incoming edges have an in-degree of 0. These vertices are the starting points for the topological sort.
顶点的in-degree是指向该顶点的边数。 没有入边的顶点的入度为0.这些顶点是拓扑排序的起点。
In the context of the previous example, these starting vertices represent algorithms and data structures that don't have any prerequisites; you don't need to learn anything else first, hence the sort starts with them.
在前一个示例的上下文中,这些起始顶点表示没有任何先决条件的算法和数据结构; 你不需要先学习任何其他东西,因此排序从它们开始。
Step 2: Traverse the graph with depth-first search
第2步:使用深度优先搜索遍历图表
Depth-first search is an algorithm that starts traversing the graph from a certain vertex and explores as far as possible along each branch before backtracking. To find out more about depth-first search, please take a look at the detailed explanation.
深度优先搜索是一种算法,它开始从某个顶点遍历图形,并在回溯之前尽可能沿每个分支进行探索。 要了解有关深度优先搜索的更多信息,请查看详细说明。
We perform a depth-first search on each vertex with in-degree 0. This tells us which vertices are connected to each of these starting vertices.
我们对每个具有in-degree 0的顶点执行深度优先搜索。这告诉我们哪些顶点连接到这些起始顶点中的每一个。
Step 3: Remember all visited vertices
第3步:记住所有访问过的顶点
As we perform the depth-first search, we maintain a list of all the vertices that have been visited. This is to avoid visiting the same vertex twice.
当我们执行深度优先搜索时,我们维护已访问的所有顶点的列表。 这是为了避免两次访问相同的顶点。
Step 4: Put it all together
第4步:全部放在一起
The last step of the sort is to combine the results of the different depth-first searches and put the vertices in a sorted list.
排序的最后一步是组合不同深度优先搜索的结果,并将顶点放在排序列表中。
Example
例子
Consider the following graph:
请考虑以下图表:
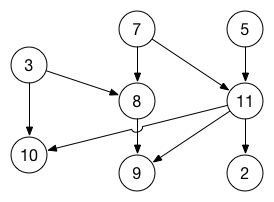
Step 1: The vertices with 0 in-degree are: 3, 7, 5. These are our starting vertices.
步骤1: 0度的顶点是:3, 7, 5。 这些是我们的起点。
Step 2: Perform depth-first search for each starting vertex, without remembering vertices that have already been visited:
步骤2:对每个起始顶点执行深度优先搜索,而不记住已经访问过的顶点:
Vertex 3: 3, 10, 8, 9
Vertex 7: 7, 11, 2, 8, 9
Vertex 5: 5, 11, 2, 9, 10
Step 3: Filter out the vertices already visited in each previous search:
步骤3:过滤掉之前每次搜索中已访问过的顶点:
Vertex 3: 3, 10, 8, 9
Vertex 7: 7, 11, 2
Vertex 5: 5
Step 4: Combine the results of these three depth-first searches. The final sorted order is 5, 7, 11, 2, 3, 10, 8, 9. (Important: we need to add the results of each subsequent search to the front of the sorted list.)
步骤4:结合这三个深度优先搜索的结果。 最终排序顺序为5,7,11,2,3,10,8,9。 (重要:我们需要将每个后续搜索的结果添加到排序列表的front。)
The result of the topological sort looks like this:
拓扑排序的结果如下所示:

Note: This is not the only possible topological sort for this graph. For example, other valid solutions are 3, 7, 5, 10, 8, 11, 9, 2 and 3, 7, 5, 8, 11, 2, 9, 10. Any order where all the arrows are going from left to right will do.
注意:这不是此图的唯一可能的拓扑排序。 例如,其他有效的解决方案是3,7,5,10,8,11,9,2和3,7,5,8,11,2,9,10。 所有箭头从左到右的任何顺序都可以。
The code
代码
Here is how you could implement topological sort in Swift (see also TopologicalSort1.swift):
以下是在Swift中实现拓扑排序的方法(另请参见TopologicalSort1.swift):
extension Graph {
  public func topologicalSort() -> [Node] {
    // 1
    let startNodes = calculateInDegreeOfNodes().filter({ _, indegree in
      return indegree == 0
    }).map({ node, indegree in
      return node
    })

    // 2
    var visited = [Node : Bool]()
    for (node, _) in adjacencyLists {
      visited[node] = false
    }

    // 3
    var result = [Node]()
    for startNode in startNodes {
      result = depthFirstSearch(startNode, visited: &visited) + result
    }

    // 4
    return result
  }
}
Some remarks:
Find the in-degree of each vertex and put all the vertices with in-degree 0 in the
startNodesarray. In this graph implementation, vertices are called "nodes". Both terms are used interchangeably by people who write graph code.The
visitedarray keeps track of whether we've already seen a vertex during the depth-first search. Initially, we set all elements tofalse.For each of the vertices in the
startNodesarray, perform a depth-first search. This returns an array of sortedNodeobjects. We prepend that array to our ownresultarray.The
resultarray contains all the vertices in topologically sorted order.
Note: For a slightly different implementation of topological sort using depth-first search, see TopologicalSort3.swift. This uses a stack and does not require you to find all vertices with in-degree 0 first.
一些讨论:
找到每个顶点的入度,并将所有顶点都置于“startNodes”数组中。 在此图实现中,顶点称为“节点”。 这两个术语可供编写图形代码的人互换使用。
“visited”数组跟踪我们是否在深度优先搜索期间已经看到过顶点。 最初,我们将所有元素设置为“false”。
对于
startNodes数组中的每个顶点,执行深度优先搜索。 这将返回一个排序的Node对象数组。 我们将该数组添加到我们自己的result数组中。result数组包含拓扑排序顺序的所有顶点。
注意:对于使用深度优先搜索的拓扑排序略有不同的实现,请参阅[TopologicalSort3.swift](TopologicalSort3.swift)。 这使用堆栈,并且不需要您首先找到具有in-degree 0的所有顶点。
Kahn's algorithm
Even though depth-first search is the typical way to perform a topological sort, there is another algorithm that also does the job.
尽管深度优先搜索是执行拓扑排序的典型方法,但还有另一种算法也能完成这项工作。
Find out what the in-degree is of every vertex.
Put all the vertices that have no predecessors in a new array called
leaders. These vertices have in-degree 0 and therefore do not depend on any other vertices.Go through this list of leaders and remove them one-by-one from the graph. We don't actually modify the graph, we just decrement the in-degree of the vertices they point to. That has the same effect.
Look at the (former) immediate neighbor vertices of each leader. If any of them now have an in-degree of 0, then they no longer have any predecessors themselves. We'll add those vertices to the
leadersarray too.This repeats until there are no more vertices left to look at. At this point, the
leadersarray contains all the vertices in sorted order.找出每个顶点的度数是多少。
将所有没有前驱的顶点放在一个名为
leaders的新数组中。 这些顶点具有in-degree 0,因此不依赖于任何其他顶点。浏览此领导者列表并从图表中逐个删除它们。 我们实际上并没有修改图形,我们只是递减它们指向的顶点的入度。 这具有相同的效果。
查看每个领导者的(前)直接邻居顶点。 如果它们中的任何一个现在具有0度的度数,则它们本身不再具有任何前辈。 我们也将这些顶点添加到
leaders数组中。这种情况一直重复,直到没有更多的顶点可供查看。 此时,
leaders数组按排序顺序包含所有顶点。
This is an O(n + m) algorithm where n is the number of vertices and m is the number of edges. You can see the implementation in TopologicalSort2.swift.
这是一个O(n + m)算法,其中n是顶点数,m是边数。 您可以在[TopologicalSort2.swift](TopologicalSort2.swift)中看到实现。
Source: I first read about this alternative algorithm in the Algorithm Alley column in Dr. Dobb's Magazine from May 1993.
资料来源:我从1993年5月开始在Dr. Dobb杂志的Algorithm Alley专栏中首次阅读这种替代算法。
Written for Swift Algorithm Club by Ali Hafizji and Matthijs Hollemans
冒泡排序(Bubble Sort)
冒泡排序是一种排序算法,它通过重复地走过过要排序的数列,一次比较两个元素,如果他们的顺序错误就把他们交换过来,这样做直到数组完全排序。 较小的项慢慢地“冒泡”到数组的开头。
Runtime:
平均: O(N^2)
最差: O(N^2)
内存
O(1)
实现
平均和最差运行时间表明冒泡排序是一种非常低效的算法,因此不会显示实现。 但是,掌握这个概念将有助于您理解简单排序算法的基础知识。
译注: 冒泡排序的动画
原文没有对冒泡排序实现,处于学习的目的,我自己实现了一下:
func bubbleSort(_ numbers:  [Int]) -> [Int]{

    var nums = numbers
    let n = nums.count
    for i in 0..<n {
        for j in 0..<(n - 1 - i) {
            if nums[j] > nums[j + 1] {
                nums.swapAt(j, j + 1)
            }
        }
    }
    return nums
}

let nums = [3,42,1,5,34,20,9]
bubbleSort(nums)
慢排序(Slow Sort)
目标:将数字数组从低到高(或从高到低)排序。
您将获得一系列数字,需要按正确的顺序排列。 插入排序算法【??】的工作原理如下:
我们可以分解按升序排序n个数字的问题
找到最大数字
1. 找到前n/2个元素的最大值
2. 找到剩余n/2个元素的最大值
3. 找到这两个最大值中的最大值对其余的进行排序
代码
这是慢速排序在Swift中的实现:
public func slowsort(_ i: Int, _ j: Int) {
    if i>=j {
        return
    }
    let m = (i+j)/2
    slowsort(i,m)
    slowsort(m+1,j)
    if numberList[j] < numberList[m] {
        let temp = numberList[j]
        numberList[j] = numberList[m]
        numberList[m] = temp
    }
    slowsort(i,j-1)
}
性能
| Case | 性能 |
|---|---|
| 最差 | slow |
| 最好 | O(n^(log(n)/(2+e)))) |
| 平均 | O(n^(log(n)/2)) |
扩展阅读