swift原文链接 https://swiftui-lab.com/swiftui-animations-part6/
Welcome to a new installment of the Advanced SwiftUI Animations series. I initiated this collection of articles back in 2019. Since then, Apple has been enhancing the framework and introducing new features. This year is no exception, with exciting additions that expand the possibilities of SwiftUI animations.
欢迎阅读“高级 SwiftUI 动画”系列的新一期。我早在 2019 年就开始了这本文章集。从那时起,Apple 一直在增强框架并引入新功能。今年也不例外,新增了令人兴奋的内容,扩展了 SwiftUI 动画的可能性。
As always, my goal is to explore every aspect of the framework, and that means I won’t be able to cover everything in a single post. As in previous installments, the new additions for this year will also be presented in multiple parts.
与往常一样,我的目标是探索框架的各个方面,这意味着我无法在一篇文章中涵盖所有内容。与前几期一样,今年的新增内容也将分多个部分呈现。
Throughout the new posts, we will discuss topics such as the Animation type and the CustomAnimation protocol, new ways to work with Transactions, and new options to specify animations. We will also discuss the new PhaseAnimator and KeyframeAnimator views and methods.
在新的文章中,我们将讨论 Animation 诸如类型和 CustomAnimation 协议、新的使用 Transactions 方法以及指定动画的新选项等主题。我们还将讨论新的 PhaseAnimator 和 KeyframeAnimator 观点和方法。
Along the way, I will also provide debugging tips for situations where your animations don’t behave as expected. Let’s get started!
在此过程中,我还将针对动画未按预期运行的情况提供调试提示。让我们开始吧!
Introduction 介绍
This part of the series will explore the new CustomAnimation protocol. In the past, once an animation got started, there was little that could be done besides interrupting it. This year, with custom animations, it is possible to interact during the animation. Bellow is an example of a custom .variableSpeed animation I created. Although it is a linear, it will let you alter its speed during its run:
本系列的这一部分将探讨新的 CustomAnimation 协议。过去,动画一旦开始,除了打断它之外,几乎无能为力。今年,通过自定义动画,可以在动画过程中进行交互。波纹管是我创建的自定义 .variableSpeed 动画的一个示例。虽然它是线性的,但它会让你在运行过程中改变它的速度: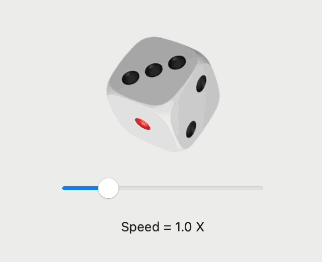
All examples, including the variableSpeed animation, are available in a single gist file that you can copy/paste directly into Xcode.
所有示例(包括 variableSpeed 动画)都包含在一个 gist 文件中,您可以直接将其复制/粘贴到 Xcode 中。
Note that the examples in this post are not very flashy, they are as plain and simple as possible. This is intentional and aims to focus on one concept at a time.
请注意,这篇文章中的例子不是很华丽,它们尽可能简单明了。这是有意为之的,旨在一次专注于一个概念。
For more on this topic, I recommend you also check Apple’s WWDC’23 video Explore SwiftUI Animation.
有关此主题的更多信息,我建议您查看 Apple 的 WWDC'23 视频探索 SwiftUI 动画。
The Animation type 动画类型
The withAnimation() and animation() methods you already know, receive an Animation value as a parameter. But what is the purpose of an Animation? In simple words, the Animation type value tells SwiftUI how long the animation runs and also indicates how to interpolate the animatable property of the view from its original to its changed value.
您已经知道的 withAnimation() 和 animation() 方法接收一个 Animation 值作为参数。但是 ? Animation 简单来说, Animation 类型值告诉 SwiftUI 动画运行多长时间,还指示如何将视图的可动画属性从其原始值插入到更改值。
For example, a linear Animation produces even changes from the beginning to the end, while an easeIn Animation will progressively accelerate the amount of change at the beginning and then stabilize into almost linear changes.
例如,线性动画从开始到结束都会产生均匀的变化,而 easeIn 动画将逐渐加速开始时的变化量,然后稳定为几乎线性的变化。
We have been using this extensively over the years. For example, in the following code:
多年来,我们一直在广泛使用它。例如,在以下代码中:
withAnimation(.easeInOut) { ... }

withAnimation(.easeInOut(duration: 2.0)) { ... }
If you look closely at the SwiftUI declaration file you will find:
如果您仔细查看 SwiftUI 声明文件,您会发现:
extension Animation {
    static var easeInOut: Animation { get }

    static func easeInOut(duration: TimeInterval) -> Animation
}
This makes it possible to write .easeInOut, instead of Animation.easeInOut, because the compiler is already expecting an Animation and knows that the dot syntax has to refer to a static variable (or static function).
这使得编写 .easeInOut 而不是 Animation.easeInOut 成为可能,因为编译器已经期待 并且 Animation 知道点语法必须引用静态变量(或静态函数)。
Until now, we’ve been limited to using one of the pre-built animations (.linear, .spring, .interactiveSpring, .easeIn, .easeOut, .easeInOut, .bouncy, and more). They are usually available as static variables with pre-configured values or as static functions with parameters that let you customize them.
到目前为止,我们仅限于使用预构建的动画之一(.linear、.spring、.interactiveSpring、.easeIn、.easeOut、.easeInOut、.bouncy 等)。它们通常可用作具有预配置值的静态变量,或作为具有允许您自定义它们的参数的静态函数。
Starting in 2023, we can add to this pool of pre-built animations. This is what this part of the series is all about.
从 2023 年开始,我们可以添加到这个预构建动画池中。这就是该系列的这一部分的全部内容。
Using Custom Animations 使用自定义动画
New this year, is the possibility of creating our own custom animations. To do so, we just create a type that adopts the CustomAnimation protocol. Then you use such animation like this:
今年的新功能是可以创建我们自己的自定义动画。为此,我们只需创建一个采用 CustomAnimation 协议的类型。然后你使用这样的动画,如下所示:
withAnimation(Animation(MyCustomAnimation())) { ... }And to follow the pre-built animation style, you can create your own Animation extension:
要遵循预构建的动画样式,您可以创建自己的动画扩展:
extension Animation {
    var myAnimation: Animation { Animation(MyCustomAnimation()) }
}
Because we extended Animation, our code will be simplify to:
由于我们扩展了 Animation,因此我们的代码将简化为:
withAnimation(.myAnimation) { ... }VectorArithmetic Protocol VectorArithmetic 协议
Because in the next sections we will extensively use types that need to conform to VectorArithmetic, it is worth spending some time refreshing what it is and why it is useful. You may already be familiar with it, especially if you read the first part of this blog post series, so feel free to skip this part if you already know what a VectorArithmetic type is.
因为在接下来的章节中,我们将广泛使用需要符合 VectorArithmetic 的类型,所以值得花一些时间来刷新它是什么以及为什么它有用。您可能已经熟悉它,特别是如果您阅读了本博客文章系列的第一部分,因此如果您已经知道什么是 VectorArithmetic 类型,请随时跳过这一部分。
We use VectorArithmetic for types that can represent a vector. In this context (SwiftUI animations), think of a vector as an n-tuple of values that can be animated. These values are advanced through the animation, by scaling or interpolating them. Conveniently, the protocol has functions that let you both scale an interpolate.
我们将 VectorArithmetic 用于可以表示向量的类型。在此上下文(SwiftUI 动画)中,将向量视为可以进行动画处理的值的 n 元组。这些值通过缩放或插值在动画中前进。方便的是,该协议具有允许您同时缩放插值的功能。
Examples of types that already adopt VectorArithmetic are Double and CGFloat. You can also make your own types conform to this protocol. For an example, checkAdvanced SwiftUI Animations: Part 1 and look for section Making Your Own Type Animatable.
已采用 VectorArithmetic 的类型示例包括 Double 和 CGFloat 。您还可以使自己的类型符合此协议。有关示例,请查看高级 SwiftUI 动画:第 1 部分,并查找“使您自己的类型可动画化”部分。
Double and CGFloat by themselves are each a 1-tuple, but we need to be able to handle n-tuples. That is, vectors with any number of values. For this purpose, there is a type called AnimatablePair. This type also conforms to VectorArithmetic but essentially encapsulates two VectorArithmetic values. So now, we can handle 2-tuples. Fortunately, because one of those values can also be an AnimatablePair, we get a 3-tuple, if both values are AnimatablePair, you get a 4-tuple, and so on. That way you can specify any number of components for your vector. To illustrate this, consider a vector that needs to hold a scale (CGFloat), an opacity value (Double) and a rotation angle (Double). Our 3-tuple vector would be defined as:
Double 它们 CGFloat 本身都是一个 1 元组,但我们需要能够处理 n 个元组。也就是说,具有任意数量值的向量。为此,有一个名为 AnimatablePair 的类型。此类型也符合 VectorArithmetic,但实质上封装了两个 VectorArithmetic 值。所以现在,我们可以处理 2 元组。幸运的是,由于其中一个值也可以是 AnimatablePair,因此我们得到一个 3 元组,如果两个值都是 AnimatablePair,则你会得到一个 4 元组,依此类推。这样,您可以为向量指定任意数量的分量。为了说明这一点,请考虑一个需要保持比例 (CGFloat)、不透明度值 (Double) 和旋转角度 (Double) 的向量。我们的 3 元组向量将定义为:
let v: AnimatablePair<AnimatablePair<CGFloat, Double>, Double>

v = AnimatablePair(AnimatablePair(10.0, 0.2), 90.0)
For more detailed examples, please refer to Advanced SwiftUI Animations: Part 1 and look for the sections titled Animating More Than One Parameter and Going Beyond Two Animatable Parameters.
有关更详细的示例,请参阅高级 SwiftUI 动画:第 1 部分,并查找标题为“为多个参数添加动画效果”和“超越两个可设置动画参数”的部分。
Fortunately, in order to implement your custom animation, you don’t need to know how many components the vector has. This is because we operate on the vector as a whole. Any interpolation or scaling we perform on it, will be done on all its components automatically, whether it’s a 1-tuple, 5-tuple, or any n-tuple the system is using behind the scenes.
幸运的是,为了实现自定义动画,您不需要知道矢量有多少个组件。这是因为我们把向量作为一个整体来操作。我们对它执行的任何插值或缩放都将在其所有组件上自动完成,无论是 1 元组、5 元组还是系统在后台使用的任何 n 元组。
CustomAnimation: func animate()自定义动画:func animate()
To create a custom animation, there is only one required method: animate(), and two optional methods: shouldMerge() and velocity(). We’ll deal with the optional methods later, so let’s focus on the most important:
若要创建自定义动画,只有一种必需方法:,以及两种可选方法: animate() shouldMerge() 和 velocity() 。我们稍后将处理可选方法,因此让我们关注最重要的方法:
func animate<V>(value: V, time: TimeInterval, context: inout AnimationContext<V>) -> V? where V : VectorArithmeticThe purpose of your implementation is to determine how the animatable values will change during the animation. This function is called repeatedly by the system, and our job is to return the updated animatable values. This continues until we return nil to end the animation. The system will stop calling animate() after that.
实现的目的是确定可动画值在动画期间将如何变化。这个函数被系统重复调用,我们的工作是返回更新的可动画值。这种情况一直持续到我们返回 nil 结束动画为止。之后系统将停止调用 animate() 。
The first parameter is our vector (which contains all animatable values), the second parameter is how much time has elapsed since the animation began, and the last parameter is an inout animation context. This context can be used to persist data between calls to the function and also allows us to read the environment of the animated view.
第一个参数是我们的向量(包含所有可动画化的值),第二个参数是自动画开始以来经过的时间,最后一个参数是 inout 动画上下文。此上下文可用于在调用函数之间保留数据,还允许我们读取动画视图的环境。
The beauty of this is that our code will be agnostic to the actual value(s) being animated. It can be a 1-tuple with opacity, or a 3-tuple with opacity, scale, and rotation, or whatever combination of animatable values the user of our CustomAnimation is changing. Most of the time, we are also that user, but we can design a custom animation without knowing what is going to be animated.
这样做的好处是,我们的代码将与正在动画化的实际值无关。它可以是具有不透明度的 1 元组,也可以是具有不透明度、缩放和旋转的 3 元组,或者 CustomAnimation 用户正在更改的任何可动画值的组合。大多数时候,我们也是那个用户,但我们可以在不知道要制作什么动画的情况下设计自定义动画。
To make our job easier, we will not be animating from the initial value to its final value, but rather the delta between them. In other words, if we are animating opacity from 0.5 to 0.8, in reality, we will be animating from 0.0 to 0.3.
为了使我们的工作更轻松,我们不会从初始值到最终值进行动画处理,而是对它们之间的增量进行动画处理。换句话说,如果我们将不透明度从 0.5 动画到 0.8,实际上,我们将动画从 0.0 到 0.3。
In most scenarios (although not necessarily), we usually return value.scaled(by: 0.0) at the beginning of the animation and value.scaled(by: 1.0) at the end. What you do in the middle will determine the curve of your animation.
在大多数情况下(尽管不一定),我们通常会在动画的开头和 value.scaled(by: 1.0) 结尾返回 value.scaled(by: 0.0) 。你在中间做什么将决定你的动画的曲线。
But let’s begin coding our first custom animation, implementing the most basic: a linear animation.
但是,让我们开始编写第一个自定义动画,实现最基本的:线性动画。
Linear Animation(Example #1)线性动画(示例 #1)
struct MyLinearAnimation: CustomAnimation {
    let duration: TimeInterval

    func animate<V>(value: V, time: TimeInterval, context: inout AnimationContext<V>) -> V? where V : VectorArithmetic {
        guard time < duration else { return nil }

        return value.scaled(by: time/duration)
    }
}

// For convenience and code readability, we extend Animation
extension Animation {
    static func myLinear(duration: TimeInterval) -> Animation { Animation(MyLinearAnimation(duration: duration)) }

    static var myLinear: Animation { Animation(MyLinearAnimation(duration: 2.0)) }
}
Then we can use our custom animation as we would with any other built-in animation. In this case, we are also adding a delay() and a repeatForever() method (which are part of the Animation type that contains our CustomAnimation). No extra work is needed for that to function!
然后,我们可以像使用任何其他内置动画一样使用自定义动画。在本例中,我们还添加了 a 和 repeatForever() a delay() 方法(它们是包含 our CustomAnimation 的 Animation 类型的一部分)。无需额外的工作即可运行!
struct ExampleView: View {
@State var animate: Bool = false
var body: some View {
Text("??")
.font(.system(size: 100))
.rotationEffect(.degrees(animate ? 360 : 0))
.task {
withAnimation(.myLinear.delay(1).repeatForever(autoreverses: false)) {
animate.toggle()
}
}
}
}The following table shows the values in several calls to the animate() function as time progresses:
下表显示了随着时间推移对 animate() 函数的多次调用中的值:
| time时间 | time/duration时间/持续时间 | value.scaled(by:time/duration) value.scaled(by:时间/持续时间) |
|---|---|---|
| 0.0 | 0.0 | 0 |
| 0.2 | 0.1 | 36 |
| 0.4 | 0.2 | 72 |
| 0.6 | 0.3 | 108 |
| 0.8 | 0.4 | 144 |
| 1.0 | 0.5 | 180 |
| 1.2 | 0.6 | 216 |
| 1.4 | 0.7 | 252 |
| 1.6 | 0.8 | 288 |
| 1.8 | 0.9 | 324 |
| 2.0 | 1.0 | 360 |
| > 2.0 | – | nil |
Also, note that animation duration is not a concept SwiftUI is aware of. It is up to the animate() function to determine when to stop. In this case, we conveniently define a duration property, and we end the animation when the time is no longer lower than duration. SwiftUI knows the animation is over because we return nil; otherwise, it would keep calling animate().
另外,请注意,动画持续时间不是 SwiftUI 知道的概念。由 animate() 函数决定何时停止。在这种情况下,我们方便地定义一个 duration 属性,当时间不再低于 duration 时,我们结束动画。SwiftUI 知道动画结束了,因为我们返回 nil 了;否则,它会继续调用 animate() .
CustomAnimation’s AnimationContext
In the previous example, we used the value and time parameters, but context was not necessary. Next, let’s see an example where it is.
在前面的示例中,我们使用了 value and time 参数,但不是 context 必需的。接下来,让我们看一个例子。
The context parameter in the animate() function has multiple uses. It may be used to read the view’s environment, but you can also use it to store information that needs to persist across calls to the CustomAnimation methods. We will explore both cases.animate() 函数中的 context 参数有多种用途。它可用于读取视图的环境,但您也可以使用它来存储需要在 CustomAnimation 调用方法时保留的信息。我们将探讨这两种情况。
AnimationContext: Environment Use Case** (Example #2)AnimationContext:环境用例(示例 #2)
Consider the following example. This new custom animation is called .random, and as you may have already guessed, it scales the value randomly. In this case, however, we are not defining a duration, so the animation never ends.
请看以下示例。这个新的自定义动画称为 .random ,正如您可能已经猜到的那样,它会随机缩放值。但是,在本例中,我们没有定义持续时间,因此动画永远不会结束。
struct ExampleView: View {
    @State var animate = false

    var body: some View {
        Text("?")
            .font(.system(size: 100))
            .offset(x: animate ? -3 : 3, y: animate ? -3 : 3)
            .animation(.random, value: animate)
            .task {
                animate.toggle()
            }
    }
}

extension Animation {
    static var random: Animation { Animation(RandomAnimation()) }
}

struct RandomAnimation: CustomAnimation {
    func animate<V>(value: V, time: TimeInterval, context: inout AnimationContext<V>) -> V? where V : VectorArithmetic {
        return value.scaled(by: Double.random(in: 0...1))
    }
}
Now let’s see how we can communicate with the animate() function from the view, in order to make it stop by the press of a button.
现在让我们看看如何从视图中与 animate() 函数进行通信,以便通过按下按钮使其停止。
To be able to communicate with an ongoing animation, we do so through the view’s environment. Our custom implementation can read the view’s environment at any time through the context parameter. You can access any of the existing environment values, but that would not help here. In our case, we will create a custom EnvironmentValue specific to our needs. Note that this is not new; we’ve been able to create custom EnvironmentValue items since SwiftUI was introduced. If you want to learn more about it, check EnvironmentKey.
为了能够与正在进行的动画进行通信,我们通过视图的环境进行通信。我们的自定义实现可以随时通过 context 参数读取视图的环境。您可以访问任何现有的环境值,但这在这里无济于事。在我们的例子中,我们将创建一个特定于我们需求的自定义。 EnvironmentValue 请注意,这并不是什么新鲜事;自 SwiftUI 推出以来,我们已经能够创建自定义 EnvironmentValue 项目。如果您想了解更多信息,请查看 EnvironmentKey。
Our custom environment value will be a boolean, with a false value as default, and we will call it stopAnimation:
我们的自定义环境值将是一个布尔值,默认值为 false,我们将其命名为 stopAnimation:
extension EnvironmentValues {
    var stopRandom: Bool {
        get { return self[StopRandomAnimationKey.self] }
        set { self[StopRandomAnimationKey.self] = newValue }
    }
}

public struct StopRandomAnimationKey: EnvironmentKey {
    public static let defaultValue: Bool = false
}
Now we can add a button to change the environment value:
现在我们可以添加一个按钮来更改环境值:
struct ExampleView: View {
    @State var animate = false
    @State var stop = false

    var body: some View {
        VStack {
            Text("?")
                .font(.system(size: 100))
                .offset(x: animate ? -3 : 3, y: animate ? -3 : 3)
                .animation(.random, value: animate)
                .task {
                    animate.toggle()
                }
                .environment(\.stopRandom, stop)

            Button("Chill Man") {
                stop.toggle()
            }
        }
    }
}
Then it is up to our animate() function to check for the stopAnimation environment value at every call. We simply return nil when stopAnimation is true.
然后由我们的 animate() 函数在每次调用时检查 stopAnimation 环境值。我们只是在 is true 时 stopAnimation 返回 nil 。
extension Animation {
    static var random: Animation { Animation(RandomAnimation()) }
}

struct RandomAnimation: CustomAnimation {
    func animate<V>(value: V, time: TimeInterval, context: inout AnimationContext<V>) -> V? where V : VectorArithmetic {

        guard !context.environment.stopRandom else { return nil }

        return value.scaled(by: Double.random(in: 0...1))
    }
}
As you can see, the environment in the context is not a snapshot at the time the animation starts, but rather a live instance of the view’s environment at the time it is being accessed.
正如你所看到的,在动画开始时,环境不是快照,而是在 context 访问视图时视图环境的实时实例。
The ability to alter the behavior of an ongoing animation opens a world of opportunities!
改变正在进行的动画行为的能力打开了一个充满机遇的世界!
AnimationContext: Data Persistence Use Case (Example #3)AnimationContext:数据持久性用例(示例 #3)
Now, to explore the data persistence use case, we will expand on the same example.
现在,为了探索数据持久性用例,我们将扩展相同的示例。
When the user stops the animation, the effect is abrupt. However, now we want to make our jittery character to cool down slowly:
当用户停止动画时,效果会很突然。但是,现在我们想让我们紧张的角色慢慢冷却下来:
In addition to indicating when to stop, we need a way for the animation to progressively fade the effect across an arbitrary amount of time.
除了指示何时停止之外,我们还需要一种方法,让动画在任意时间内逐渐淡化效果。
To add our own data to the context, we need to define an AnimationStateKey. This process is very similar of how you define new EnvironmentValue keys:
要将自己的数据添加到上下文中,我们需要定义一个 AnimationStateKey。此过程与定义新 EnvironmentValue 键的方式非常相似:
private struct RandomAnimationState<Value: VectorArithmetic>: AnimationStateKey {
    var stopRequest: TimeInterval? = nil

    static var defaultValue: Self { RandomAnimationState() }
}

extension AnimationContext {
    fileprivate var randomState: RandomAnimationState<Value> {
        get { state[RandomAnimationState<Value>.self] }
        set { state[RandomAnimationState<Value>.self] = newValue }
    }
}
The data we want to persist is the time of the animation when the stop request was performed. With this value and the time parameter of the animate() function, we can now determine how much time has elapsed since the user requested to stop. As time goes by, we decrease the randomness of the animation more and more until we eventually end it by returning nil.
我们想要保留的数据是执行停止请求时动画的时间。使用此值和 animate() 函数的时间参数,我们现在可以确定自用户请求停止以来已经过去了多少时间。随着时间的流逝,我们越来越多地降低动画的随机性,直到我们最终通过返回 nil 来结束它。
We will also add a custom parameter to our animation (fadeTime) that will let us customize how long it will take for the animation to end after the user requested it through the environment.
我们还将在动画中添加一个自定义参数 (fadeTime),该参数将允许我们自定义在用户通过环境请求动画后动画结束所需的时间。
extension Animation {
    static func random(fade: Double = 1.0) -> Animation { Animation(RandomAnimationWithFade(fadeTime: fade)) }
}

struct RandomAnimationWithFade: CustomAnimation {
    // time to fade randomness since stop starts to end of animation
    let fadeTime: Double

    func animate<V>(value: V, time: TimeInterval, context: inout AnimationContext<V>) -> V? where V : VectorArithmetic {

        if context.environment.stopRandom { // animation stop requested
            if context.randomState.stopRequest == nil {
                context.randomState.stopRequest = time
            }

            let randomIntensity = (time - context.randomState.stopRequest!) / fadeTime

            if randomIntensity > 1 { return nil }

            return value.scaled(by: Double.random(in: randomIntensity...1))
        } else {
            return value.scaled(by: Double.random(in: 0...1))
        }
    }
}
Now our view code will slightly change to specify the fade time (2.0 seconds):
现在,我们的视图代码将略有更改以指定淡入淡出时间(2.0 秒):
struct ExampleView: View {
    @State var animate = false
    @State var stop = false

    var body: some View {
        VStack(spacing: 10) {
            Text("?")
                .font(.system(size: 100))
                .offset(x: animate ? 0 : 6, y: animate ? 0 : 6)
                .animation(.random(fade: 2.0), value: animate)
                .task {
                    animate.toggle()
                }
                .environment(\.stopRandom, stop)

            Button("Chill Man!") {
                stop.toggle()
            }
        }
    }
}
Restarting the Animation 重新启动动画
In the above examples, if you press the button again, you will notice the animation won’t resume. That is because when you stopped it, the animate() function returned nil. When this happens, SwiftUI removes the animation, and it no longer exists. To restart it, you need to create a new animation by triggering it again:
在上面的示例中,如果再次按下该按钮,您会注意到动画不会恢复。那是因为当您停止它时,该 animate() 函数返回 nil .发生这种情况时,SwiftUI 会移除动画,并且它不再存在。要重新启动它,您需要通过再次触发它来创建一个新动画:
Button("Chill Man!") {
    stop.toggle()

    if !stop { animate.toggle() }
}
CustomAnimation: func shouldMerge()自定义动画:func shouldMerge()
When creating a new animation, SwiftUI will determine if there is already a running animation for the same view property. If so, it will ask the new animation how it wants to handle that. This is decided in the implementation of the interrupting animation’s shouldMerge() method.
创建新动画时,SwiftUI 将确定同一视图属性是否已经存在正在运行的动画。如果是这样,它将询问新动画它想要如何处理它。这是在中断动画 shouldMerge() 方法的实现中决定的。
Your implementation returns a boolean value. If you return false (this is the default if left unimplemented), both animations (old and new) will run their course, and their results will be combined by the system.
您的实现返回一个布尔值。如果返回 false(如果未实现,则为默认值),则两个动画(旧动画和新动画)都将运行其过程,并且系统将合并其结果。
However, if you return true, this indicates that you want the new animation to merge with the previous one. The system will remove the original animation and continue with your new animation. To properly merge, the shouldMerge method receives some useful information that can be later used by your animate() implementation:
但是,如果返回 true,则表示您希望新动画与前一个动画合并。系统将删除原始动画并继续播放新动画。为了正确合并,该 shouldMerge 方法会接收一些有用的信息,这些信息稍后可以由您的 animate() 实现使用:
func shouldMerge(previous: Animation, value: V, time: TimeInterval, context: inout AnimationContext<V>) -> BoolThe previous parameter provides the original animation to merge with. We also receive the value to animate towards, the elapsed time so far, and the animation context.
该 previous 参数提供要合并的原始动画。我们还会收到 value to animate towards、 time 到目前为止已经过去和动画 context 。
This is better understood with an example.
通过一个例子可以更好地理解这一点。
Merging Animations (Example #4)合并动画(示例 #4)
Consider the system’s .linear animation. This animation’s shouldMerge() method returns false and allows the system to combine both animations. In the following example, a linear animation is interrupted by another linear animation. You will notice that this results in a deceleration and acceleration of the overall animation.
考虑系统的 .linear 动画。此动画 shouldMerge() 的方法返回 false,并允许系统组合两个动画。在以下示例中,一个线性动画被另一个线性动画打断。您会注意到,这会导致整个动画的减速和加速。
To test it, simply click twice on the animate button:
要测试它,只需在动画按钮上单击两次: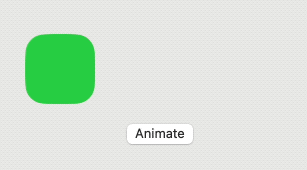
struct ExampleView: View {
    @State var offset: CGFloat = -100.0

    var body: some View {
        VStack(spacing: 20) {
            RoundedRectangle(cornerRadius: 20)
                .fill(.green)
                .frame(width: 70, height: 70)
                .offset(x: offset)

            Button("Animate") {
                withAnimation(.linear(duration: 1.5)) {
                    offset = (offset == 100 ? -100 : 100)
                }
            }
        }
    }
}
Returning false (or leaving the function without implementation) is the easiest route, but sometimes the results may not be what we want. For those cases, let’s explore how we can take advantage of shouldMerge().
返回 false(或让函数不实现)是最简单的方法,但有时结果可能不是我们想要的。对于这些情况,让我们探讨如何利用 shouldMerge() .
We are going to work with the myLinear animation from the first example, but instead of letting SwiftUI combine animations, we want to avoid the deceleration/acceleration that results from combining. For our example, we want our animation to be linear at all times, even when an interruption occurs.
我们将使用第一个示例中的 myLinear 动画,但我们希望避免组合导致的减速/加速,而不是让 SwiftUI 组合动画。对于我们的示例,我们希望我们的动画始终是线性的,即使发生中断也是如此。
Returning true in shouldMerge() is not enough; we need to add some logic for this to work. The animate() method needs some extra information to keep it linear. In addition to using shouldMerge() to tell SwiftUI to merge, we are going to take the opportunity to save some data from the original animation that is going to be needed in the new one. We are going to use the context to persist this information. Unlike the previous example where the context was saving a single value (TimeInterval), we are now going to create a custom type (MyLinearState), which will store the time of the interruption and the value at the time it was interrupted.
返回 true shouldMerge() in 是不够的;我们需要添加一些逻辑才能使其工作。该 animate() 方法需要一些额外的信息来保持其线性。除了用于 shouldMerge() 告诉 SwiftUI 合并之外,我们还将借此机会保存原始动画中的一些数据,这些数据将在新动画中需要。我们将使用 来 context 持久化此信息。与前面保存单个值 (TimeInterval) 的示例 context 不同,我们现在将创建一个自定义类型 ( MyLinearState ),它将存储中断时间和中断时的值。
struct MyLinearState<Value: VectorArithmetic>: AnimationStateKey {
    var from: Value? = nil
    var interruption: TimeInterval? = nil

    static var defaultValue: Self { MyLinearState() }
}

extension AnimationContext {
    var myLinearState: MyLinearState<Value> {
        get { state[MyLinearState<Value>.self] }
        set { state[MyLinearState<Value>.self] = newValue }
    }
}
Note that in our shouldMerge(), we will use the previous parameter to query the original animation for its value at the time of the interruption:
请注意,在我们的 shouldMerge() 中,我们将使用该 previous 参数来查询原始动画在中断时的值:
    func shouldMerge<V>(previous: Animation, value: V, time: TimeInterval, context: inout AnimationContext<V>) -> Bool where V : VectorArithmetic {

        context.myLinearState.from = previous.base.animate(value: value, time: time, context: &context)
        context.myLinearState.interruption = time

        return true
    }
Now our animate() implementation will use this information to properly animate when replacing an interrupted animation:
现在,我们的 animate() 实现将在替换中断的动画时使用此信息来正确制作动画:
func animate<V>(value: V, time: TimeInterval, context: inout AnimationContext<V>) -> V? where V : VectorArithmetic {

        guard time < duration + (context.myLinearState.interruption ?? 0) else { return nil }

        if let v = context.myLinearState.from {
            return v.interpolated(towards: value, amount: (time-context.myLinearState.interruption!)/duration)
        } else {
            return value.scaled(by: time/duration)
        }
    }
The following image compares the system .linear animation, and our custom animation both returning false and true for shouldMerge(). Check Example4() in the gist file for the full code:
下图比较了系统 .linear 动画和我们的自定义动画,它们都为 shouldMerge() 返回 false 和 true。检查 gist 文件中的 Example4() 以获取完整代码: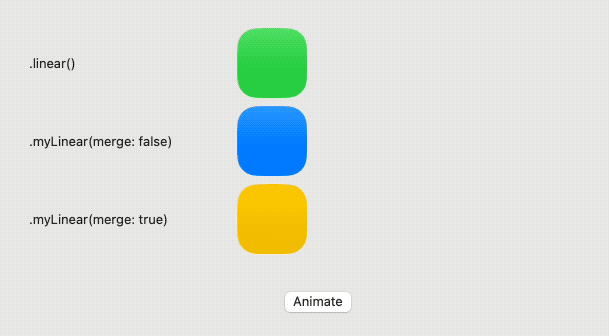
Notice how in our new merging implementation (yellow), movement is linear at all times, and we managed to keep the overall time of the animation the same in all cases.
请注意,在我们的新合并实现(黄色)中,移动始终是线性的,并且我们设法在所有情况下保持动画的总时间相同。
CustomAnimation: func velocity()自定义动画:func velocity()
When animations merge, to achieve a smooth transition, the new animation may request the original animation’s velocity at the moment of the merge. In our previous example, we didn’t need to check for velocity because we were seeking an abrupt change. We wanted all changes to occur strictly linearly.
当动画合并时,为了实现平滑过渡,新动画可能会在合并时请求原始动画的速度。在前面的示例中,我们不需要检查速度,因为我们正在寻求突然的变化。我们希望所有变化都严格线性地发生。
Your view of the velocity() method will be different if you are writing the code for the original animation, the interrupting animation, or both. When you are writing the interrupted (original) animation, your implementation of velocity() will be called (usually by the shouldMerge() method of the interrupting (new) animation). On the contrary, if you are writing the code for the interrupting animation and your implementation of shouldMerge() returns true, you will probably want to call the interrupted animation’s velocity() method to integrate it into your calculations. In general, you have to pay attention to both cases, as animations can often be both: interrupted and interrupting.
如果您正在为原始动画和/或中断动画编写代码,则 velocity() 对方法的看法会有所不同。当你在编写中断的(原始)动画时,你的实现 velocity() 将被调用(通常通过中断(新)动画 shouldMerge() 的方法)。相反,如果您正在为中断动画编写代码,并且您的实现 shouldMerge() 返回 true,则可能需要调用中断动画 velocity() 的方法将其集成到您的计算中。一般来说,你必须注意这两种情况,因为动画通常可以同时是:中断和中断。
It is worth pausing here for a moment to contemplate what velocity is. Velocity encompasses both the speed and the direction of an object’s motion. Now, let’s delve into the definition of speed: we can define it as the magnitude of change within a specified amount of time. It’s important not to confuse speed with acceleration. The concept of direction is self-explanatory, but we will later explore its specific implications in the context of SwiftUI animations.
值得在这里停下来思考一下什么是速度。速度包括物体运动的速度和方向。现在,让我们深入研究速度的定义:我们可以将其定义为在指定时间内的变化幅度。重要的是不要将速度与加速度混为一谈。方向的概念是不言自明的,但我们稍后将在 SwiftUI 动画的上下文中探讨它的具体含义。
For a linear animation, the velocity function should be:
对于线性动画,速度函数应为:
func velocity<V>(value: V, time: TimeInterval, context: AnimationContext<V>) -> V? where V : VectorArithmetic {
        return value.scaled(by: 1.0/duration)
}
Remember that scaled(by: 0.0) typically represents the initial value of the animation, indicating when nothing has changed yet. On the other end, scaled(by: 1.0) represents the entirety of the change produced when the animation has concluded. In a linear animation, the speed remains constant throughout, so the function should consistently return the same value: scaled(by: 1.0/duration). In other words, it indicates how much the animation scales per second. For example, if the animation lasts for 4.0 seconds, in one second, it would have scaled by 1.0/4.0 = 0.25.
请记住,这 scaled(by: 0.0) 通常表示动画的初始值,指示何时尚未发生任何更改。另一方面, scaled(by: 1.0) 表示动画结束时产生的整个更改。在线性动画中,速度始终保持不变,因此该函数应始终返回相同的值: scaled(by: 1.0/duration) 。换句话说,它表示动画每秒缩放的程度。例如,如果动画持续 4.0 秒,则在一秒钟内,它将缩放 1.0/4.0 = 0.25 。
Now, let’s consider the concept of direction. As previously mentioned, velocity encompasses both speed and direction. In this context, whether the scaling is positive or negative can be seen as indicating the direction in which the change is produced.
现在,让我们考虑方向的概念。如前所述,速度包括速度和方向。在这种情况下,缩放是正的还是负的,都可以看作是指示产生变化的方向。
Velocity Values (Example #5)速度值(示例 #5)
To visually illustrate velocity, we will have our custom linear animation interrupted by a Spring animation. It’s a known fact that SwiftUI spring animations utilize the velocity of the interrupted animation to incorporate it into their changes. Therefore, in this case, the spring’s shouldMerge function will call our custom animation’s velocity method.
为了直观地说明速度,我们将用 Spring 动画打断自定义线性动画。众所周知,SwiftUI 弹簧动画利用中断动画的速度将其合并到其更改中。因此,在这种情况下,spring shouldMerge 的函数将调用我们自定义动画 velocity 的方法。
In the following example, we will compare our linear animation with three different velocity values. In the middle of the linear animation we will interrupt with a spring and see the results.
在下面的示例中,我们将使用三个不同的速度值比较我们的线性动画。在线性动画的中间,我们将用弹簧打断并查看结果。
The first example is the right velocity (1.0/duration), and the other two will be greatly exaggerated values (-5.0 and 5.0):
第一个例子是右速度(1.0/持续时间),另外两个将是大大夸张的值(-5.0 和 5.0):
return value.scaled(by: 1.0/duration)

return value.scaled(by: 5.0)

return value.scaled(by: -5.0)
The following capture shows how the linear animation is interrupted by the spring animation:
以下捕获显示了线性动画如何被弹簧动画中断: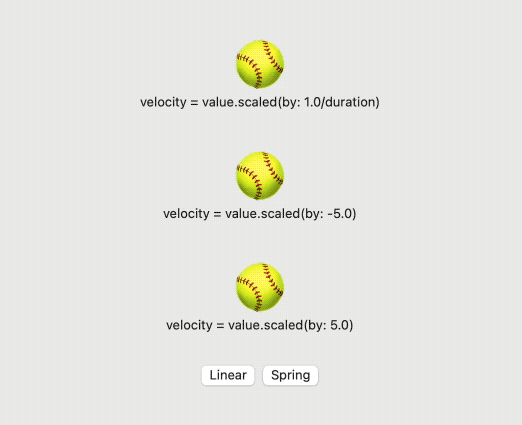
For the full code, check for Example5 in the gist file reference at the beginning of this article.
有关完整代码,请查看本文开头的 gist 文件参考中的 Example5。
Debugging Custom Animations Tips调试自定义动画提示
If you encounter difficulties achieving your desired animations, here are some tips that can assist you in figuring out why.
如果您在实现所需的动画时遇到困难,这里有一些提示可以帮助您找出原因。
Tip #1
I previously mentioned that your custom animation should be agnostic to the actual value being animated. However, during development, you might want to log the values you receive and the values you return. Even though you may not know the specific type behind the VectorArithmetic value, you can still
access its value. The simplest approach is to print the value to the console.
我之前提到过,您的自定义动画应该与正在动画处理的实际值无关。但是,在开发过程中,您可能希望记录收到的值和返回的值。即使您可能不知道
VectorArithmetic 值背后的特定类型,您仍然可以访问其值。最简单的方法是将值打印到控制台。
func animate<V>(value: V, time: TimeInterval, context: inout AnimationContext<V>) -> V? where V : VectorArithmetic {
   guard time < duration else { return nil }

   let r = value.scaled(by: time/duration)

   print("TIME: \(time)\nVALUE: \(value)\nRETURN: \(r)")

   return r
}
The output for one of the last calls to animate() will be something like this:
最后一次调用之一的输出 animate() 将如下所示:
TIME: 1.9891413750010543
VALUE: AnimatablePair<AnimatablePair<CGFloat, CGFloat>, AnimatablePair<CGFloat, CGFloat>>(first: SwiftUI.AnimatablePair<CoreGraphics.CGFloat, CoreGraphics.CGFloat>(first: -100.0, second: 0.0), second: SwiftUI.AnimatablePair<CoreGraphics.CGFloat, CoreGraphics.CGFloat>(first: 0.0, second: 0.0))
RETURN: AnimatablePair<AnimatablePair<CGFloat, CGFloat>, AnimatablePair<CGFloat, CGFloat>>(first: SwiftUI.AnimatablePair<CoreGraphics.CGFloat, CoreGraphics.CGFloat>(first: -99.45706875005271, second: 0.0), second: SwiftUI.AnimatablePair<CoreGraphics.CGFloat, CoreGraphics.CGFloat>(first: 0.0, second: 0.0))
After you clean it up, you can see the vector has 4 components, all CGFloat, with the following values:
清理后,您可以看到向量有 4 个分量,所有 CGFloat 分量都具有以下值:
TIME: 1.9891413750010543
VALUE: -100.0, 0.0, 0.0, 0.0
RESULT: -99.45706875005271, 0.0, 0.0, 0.0
Tip #2
If you want to be more sophisticated and wish for a more legible output, instead of printing it straight, you could use Reflection (Mirror) to extract the data you need. There is already plenty of information on how to use Mirror, so I will not cover it here.
如果您想要更复杂并希望输出更清晰,则可以使用反射(镜像)来提取所需的数据,而不是直接打印。关于如何使用 Mirror 的信息已经很多了,这里就不一一赘述了。
Summing It Up 总结一下
This year’s addition to the series of animation articles is presented as a multipart series. In this initial installment (part 6 overall), we explored the creation and utilization of the CustomAnimation protocol.
今年对动画系列文章的补充以多部分系列的形式呈现。在最初的部分(总共第 6 部分)中,我们探讨了该协议 CustomAnimation 的创建和使用。
I hope you found this blog post helpful, but the journey doesn’t end here. In upcoming posts, I will be covering other interesting animation features brought by WWDC ’23.
我希望这篇博文对您有所帮助,但旅程并没有就此结束。在接下来的文章中,我将介绍 WWDC '23 带来的其他有趣的动画功能。