原文链接 https://swiftui-lab.com/swiftui-animations-part2/
In the first part of this series, I introduced the Animatable protocol, and how we can use it to animate Paths. Next we are going to use the same protocol to animate transform matrices, using a new tool: GeometryEffect. If you haven’t read part 1, and don’t know what the Animatable protocol is, you should read it first. However, if you are interested in GeometryEffect, but don’t care to animate it, you can skip part 1 and continue reading here.
在本系列的第一部分中,我介绍了 Animatable 协议,以及如何使用它来制作路径动画。接下来,我们将使用相同的协议来使用新工具对变换矩阵进行动画处理: GeometryEffect。如果你还没有读过第 1 部分,并且不知道 Animatable 协议是什么,你应该先阅读它。但是,如果您对 GeometryEffect 感兴趣,但不想为它制作动画,您可以跳过第 1 部分并继续阅读此处。
The complete sample code for this article can be found at:
本文的完整示例代码可在以下位置找到:
gist.github.com/swif...
Example8 requires images from an Asset catalog. Download it from here:
Example8 需要资产目录中的图像。从这里下载:
swiftui-lab.com/?smd...
GeometryEffect 几何效果
GeometryEffect is a protocol that conforms to Animatable and ViewModifier. To conform with GeometryEffect, you need to implement the following method:
GeometryEffect 是符合 Animatable 和 ViewModifier 的协议。要符合 GeometryEffect ,您需要实现以下方法:
func effectValue(size: CGSize) -> ProjectionTransformLet’s say your method is called SkewEffect, in order to apply it to a view, you would use it like this:
假设您的方法名为 SkewEffect,为了将其应用于视图,您可以像这样使用它:
Text("Hello").modifier(SkewEfect(skewValue: 0.5))Text("Hello") will be transformed with the matrix created by the SkewEfect.effectValue() method. As simple as that. Note that the changes will affect the view, but without affecting the layout of its ancestors or descendants.
Text("Hello") 将使用该 SkewEfect.effectValue()` 方法创建的矩阵进行转换。就这么简单。请注意,这些更改将影响视图,但不会影响其祖先或后代的布局。
Because GeometryEffect also conforms to Animatable, you may add an animatableData property, et voilà, you have an animatable effect.
因为 GeometryEffect 也符合 ,你可以添加一个 animatableData 属性,等等 Animatable ,你有一个可动画的效果。
You may not be aware, but you are probably using GeometryEffect all the time. If you ever used .offset(), you are actually using GeometryEffect. Let me show you how it is implemented:
你可能不知道,但你可能一直在使用 GeometryEffect 。如果你曾经使用 .offset() 过,你实际上是在使用 GeometryEffect .让我向您展示它是如何实现的:
public extension View {
    func offset(x: CGFloat, y: CGFloat) -> some View {
        return modifier(_OffsetEffect(offset: CGSize(width: x, height: y)))
    }

    func offset(_ offset: CGSize) -> some View {
        return modifier(_OffsetEffect(offset: offset))
    }
}

struct _OffsetEffect: GeometryEffect {
    var offset: CGSize

    var animatableData: CGSize.AnimatableData {
        get { CGSize.AnimatableData(offset.width, offset.height) }
        set { offset = CGSize(width: newValue.first, height: newValue.second) }
    }

    public func effectValue(size: CGSize) -> ProjectionTransform {
        return ProjectionTransform(CGAffineTransform(translationX: offset.width, y: offset.height))
    }
}
Animation Keyframes 动画关键帧
Most animation frameworks have the concept of keyframes. It is a way of telling the animating engine to divide the animation in blocks. Although SwiftUI does not come with these feature, we can simulate it. In the following example, we are going to create an effect that moves a view horizontally, but it also skews at the beginning and un-skews at the end:
大多数动画框架都有关键帧的概念。它是一种告诉动画引擎将动画划分为块的方法。虽然 SwiftUI 没有这些功能,但我们可以模拟它。在下面的示例中,我们将创建一个水平移动视图的效果,但它在开始时也会倾斜,在结束时会取消倾斜:

The skew effect needs to increase and decrease during the first and last 20% of the animation. In the middle, the skew effect will remain steady. Ok, now we have a challenge, let’s see how we solve it.
在动画的第一个和最后 20% 期间,倾斜效果需要增加和减少。在中间,偏斜效应将保持稳定。好的,现在我们有一个挑战,让我们看看我们如何解决它。
We will start by creating an effect that skews and moves our view, without paying too much attention to the 20% requirement. If you don’t know much about transformation matrices, that’s alright. It’s enough to know that: the CGAffineTransform c parameter drives the skew, and the tx, the x offset:
我们将首先创建一个扭曲和移动我们视野的效果,而不会过多关注 20% 的要求。如果你对变换矩阵了解不多,那也没关系。只要知道这一点就足够了: CGAffineTransform c 参数驱动偏斜,tx 驱动 x 偏移:

struct SkewedOffset: GeometryEffect {
    var offset: CGFloat
    var skew: CGFloat

    var animatableData: AnimatablePair<CGFloat, CGFloat> {
        get { AnimatablePair(offset, skew) }
        set {
            offset = newValue.first
            skew = newValue.second
        }
    }

    func effectValue(size: CGSize) -> ProjectionTransform {
        return ProjectionTransform(CGAffineTransform(a: 1, b: 0, c: skew, d: 1, tx: offset, ty: 0))
    }
}
Faking It 假装
Ok, so now the fun part. To simulate keyframes, we will define an animatable parameter that we will change from 0 to 1. When that parameter is at 0.2, we reached the first 20% of the animation. When the parameter is 0.8 or bigger, we are in the last 20% of the animation. Our code should use that to change the effect accordingly. And to top it all off, we will also tell the effect if we are moving the view right or left, so it can skew to one side, or the other:
好的,现在是有趣的部分。为了模拟关键帧,我们将定义一个可动画的参数,我们将从 0 更改为 1。当该参数为 0.2 时,我们达到了动画的前 20%。当参数为 0.8 或更大时,我们处于动画的最后 20%。我们的代码应该使用它来相应地改变效果。最重要的是,我们还将告诉效果是向右还是向左移动视图,这样它就可以向一侧或另一侧倾斜:
struct SkewedOffset: GeometryEffect {
    var offset: CGFloat
    var pct: CGFloat
    let goingRight: Bool

    init(offset: CGFloat, pct: CGFloat, goingRight: Bool) {
        self.offset = offset
        self.pct = pct
        self.goingRight = goingRight
    }

    var animatableData: AnimatablePair<CGFloat, CGFloat> {
        get { return AnimatablePair<CGFloat, CGFloat>(offset, pct) }
        set {
            offset = newValue.first
            pct = newValue.second
        }
    }

    func effectValue(size: CGSize) -> ProjectionTransform {
        var skew: CGFloat

        if pct < 0.2 {
            skew = (pct * 5) * 0.5 * (goingRight ? -1 : 1)
        } else if pct > 0.8 {
            skew = ((1 - pct) * 5) * 0.5 * (goingRight ? -1 : 1)
        } else {
            skew = 0.5 * (goingRight ? -1 : 1)
        }

        return ProjectionTransform(CGAffineTransform(a: 1, b: 0, c: skew, d: 1, tx: offset, ty: 0))
    }
}
Now, just for the fun of it, we will apply the effect to multiple views, but their animations will be staggered, using the .delay() animation modifier. The full code is available as Example6, in the gist file linked at the top of this page.
现在,为了好玩,我们将把效果应用于多个视图,但它们的动画将使用 .delay() 动画修饰符交错。完整代码以示例6的形式提供,位于本页顶部链接的gist文件中。
Animation Feedback 动画反馈
In the next example, I will show you a simple technique, that will let our view react to the progress of the effect’s animation.
在下一个示例中,我将向您展示一个简单的技术,该技术将让我们的视图对效果动画的进度做出反应。
We will create an effect that let us perform a 3d rotation. Although SwiftUI already has a modifier for that, .rotation3DEffect(), this one will be special. Whenever our view rotates enough to show us the other side, a Boolean binding will be updated.
我们将创建一个效果,让我们执行 3D 旋转。尽管 SwiftUI 已经为此提供了一个修饰符, .rotation3DEffect() 但这个修饰符会很特别。每当我们的视图旋转到足以向我们显示另一侧时,布尔绑定就会更新。
By reacting to that change in the bound variable, we will be able to replace the view being rotated, right in the middle of the animation. This will create the illusion that the view has two sides. Here’s an example:
Implementing Our Effect 实施我们的效果
Let’s start by creating our effect. You will notice that the 3d rotation transform, may be slightly different than what you may be used to with Core Animation. In SwiftUI, the default anchor point is at the top leading corner of the view, while in Core Animation it is at the center. Although the existing .rotationg3DEffect() modifier let you specify an anchor point, we are building our own effect. This means we will have to deal with it ourselves. Since we cannot change the anchor point, we will need to add some translations to the mix:
让我们从创建效果开始。您会注意到,3D 旋转变换可能与 Core Animation 的习惯略有不同。在 SwiftUI 中,默认锚点位于视图的顶部前导角,而在 Core Animation 中,它位于中心。尽管现有的 .rotationg3DEffect() 修饰符允许您指定锚点,但我们正在构建自己的效果。这意味着我们将不得不自己处理它。由于我们无法更改锚点,因此我们需要在组合中添加一些翻译:
struct FlipEffect: GeometryEffect {

    var animatableData: Double {
        get { angle }
        set { angle = newValue }
    }

    @Binding var flipped: Bool
    var angle: Double
    let axis: (x: CGFloat, y: CGFloat)

    func effectValue(size: CGSize) -> ProjectionTransform {

        // We schedule the change to be done after the view has finished drawing,
        // otherwise, we would receive a runtime error, indicating we are changing
        // the state while the view is being drawn.
        DispatchQueue.main.async {
            self.flipped = self.angle >= 90 && self.angle < 270
        }

        let a = CGFloat(Angle(degrees: angle).radians)

        var transform3d = CATransform3DIdentity;
        transform3d.m34 = -1/max(size.width, size.height)

        transform3d = CATransform3DRotate(transform3d, a, axis.x, axis.y, 0)
        transform3d = CATransform3DTranslate(transform3d, -size.width/2.0, -size.height/2.0, 0)

        let affineTransform = ProjectionTransform(CGAffineTransform(translationX: size.width/2.0, y: size.height / 2.0))

        return ProjectionTransform(transform3d).concatenating(affineTransform)
    }
}
By looking at the geometry effect code, there’s one interesting fact. The @Binding property flipped. We use it to report back to the view, which side is facing the user.
通过查看几何效果代码,有一个有趣的事实。 @Binding 该属性翻转了。我们用它来向视图报告,哪一侧面向用户。
In our view, we will use the flipped value to conditionally display one of two views. However, in this specific example, we will use one more trick. If
you pay close attention to the video, you will see that the card keeps changing. The back side is always the same, but the front side changes at every turn. So it is not as simple as showing one view for one side, and another for the other side. Instead of basing our views on flipped‘s value, we want to monitor flipped value changes. And at every full turn, we’ll use a different card.
在我们看来,我们将使用翻转的值有条件地显示两个视图之一。但是,在这个特定示例中,我们将使用另一个技巧。如果你仔细观察视频,你会看到卡片在不断变化。背面总是一样的,但正面在每一个转弯处都在变化。因此,它并不像为一侧显示一个视图,为另一侧显示另一个视图那么简单。我们不想将观点建立在翻转值的基础上,而是要监控翻转值的变化。在每一个完整的回合中,我们都会使用不同的卡片。
We have an array of image names, and we want to go through each. To do that, we’ll use a custom binding variable. This trick is best explained with code:
我们有一个图像名称数组,我们想遍历每个图像名称。为此,我们将使用自定义绑定变量。这个技巧最好用代码来解释:
struct RotatingCard: View {
    @State private var flipped = false
    @State private var animate3d = false
    @State private var rotate = false
    @State private var imgIndex = 0

    let images = ["diamonds-7", "clubs-8", "diamonds-6", "clubs-b", "hearts-2", "diamonds-b"]

    var body: some View {
        let binding = Binding<Bool>(get: { self.flipped }, set: { self.updateBinding($0) })

        return VStack {
            Spacer()
            Image(flipped ? "back" : images[imgIndex]).resizable()
                .frame(width: 265, height: 400)
                .modifier(FlipEffect(flipped: binding, angle: animate3d ? 360 : 0, axis: (x: 1, y: 5)))
                .rotationEffect(Angle(degrees: rotate ? 0 : 360))
                .onAppear {
                    withAnimation(Animation.linear(duration: 4.0).repeatForever(autoreverses: false)) {
                        self.animate3d = true
                    }

                    withAnimation(Animation.linear(duration: 8.0).repeatForever(autoreverses: false)) {
                        self.rotate = true
                    }
            }
            Spacer()
        }
    }

    func updateBinding(_ value: Bool) {
        // If card was just flipped and at front, change the card
        if flipped != value && !flipped {
            self.imgIndex = self.imgIndex+1 < self.images.count ? self.imgIndex+1 : 0
        }

        flipped = value
    }
}
The full code is available as Example7, in the gist file linked at the top of this page.
完整代码以 Example7 的形式提供,位于本页顶部链接的 gist 文件中。
As mentioned earlier, instead of changing the image name, we may want to use two completely different views. That is also possible. Here’s an example:
如前所述,我们可能希望使用两个完全不同的视图,而不是更改图像名称。这也是可能的。下面是一个示例:
Color.clear.overlay(ViewSwapper(showFront: flipped))
.frame(width: 265, height: 400)
.modifier(FlipEffect(flipped: $flipped, angle: animate3d ? 360 : 0, axis: (x: 1, y: 5)))
struct ViewSwapper: View {
let showFront: Bool
var body: some View {
Group {
if showFront {
FrontView()
} else {
BackView()
}
}
}
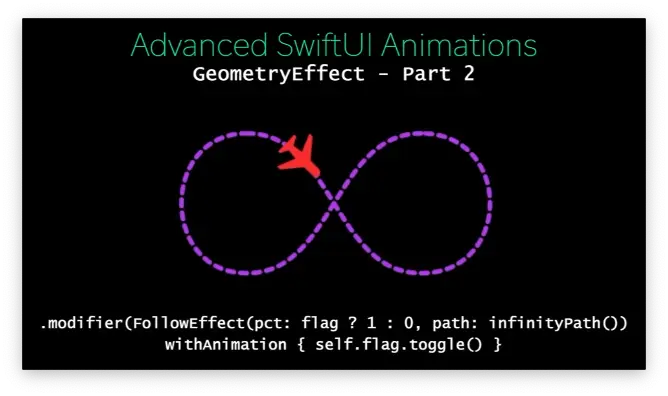
}Make a View Follow a Path 使视图遵循路径
Next, we are going to build a completely different GeometryEffect. In this example, our effect will move a view through an arbitrary Path. This problem has two main challenges:
接下来,我们将构建一个完全不同的 GeometryEffect。在此示例中,我们的效果将通过任意路径移动视图。这个问题有两个主要挑战:
How to obtain the coordinate of a specific point in the path.
如何获取路径中特定点的坐标。How to determine the orientation of the view while moving through the Path. In this specific case, how do we know where to point the airplane’s nose (spoiler alert, a little trigonometry goes a long way).
如何在路径中移动时确定视图的方向。在这种特殊情况下,我们如何知道将飞机的机头指向哪里(剧透警报,一点三角函数有很长的路要走)。
The animatable parameter of this effect will be pct. It represents the position of the airplane in the path. If we want to animate the airplane to perform a complete turn, we will use values from 0 to 1. For a value of 0.25, it means the airplane has advanced 1/4 of the path.
此效果的可动画参数将为 pct。它表示飞机在路径中的位置。如果我们想对飞机进行动画处理以执行完整的转弯,我们将使用从 0 到 1 的值。对于值 0.25,表示飞机已前进了路径的 1/4。
Finding the x, y position in the Path 在路径中查找 x、y 位置
In order to obtain the x and y position of the airplane at a given pct value, we are going to use the .trimmedPath() modifier of the Path struct. Given a starting and ending percentage, the method returns a CGRect. It contains the bounds of that segment of the path. For our needs, we simply call it with very close starting and ending points. It will return a very small rectangle, and we’ll use its center as our x and y position.
为了在给定的 pct 值下获得飞机的 x 和 y 位置,我们将使用 Path 结构的 .trimmedPath() 修饰符。给定开始和结束百分比,该方法返回 CGRect。它包含该路径段的边界。为了满足我们的需要,我们简单地用非常接近的起点和终点来称呼它。它将返回一个非常小的矩形,我们将使用它的中心作为我们的 x 和 y 位置。
func percentPoint(_ percent: CGFloat) -> CGPoint {
    // percent difference between points
    let diff: CGFloat = 0.001
    let comp: CGFloat = 1 - diff

    // handle limits
    let pct = percent > 1 ? 0 : (percent < 0 ? 1 : percent)

    let f = pct > comp ? comp : pct
    let t = pct > comp ? 1 : pct + diff
    let tp = path.trimmedPath(from: f, to: t)

    return CGPoint(x: tp.boundingRect.midX, y: tp.boundingRect.midY)
}
Finding the direction 寻找方向
To obtain the rotation angle of our plane, we’ll use a little trigonometry. Using the technique describe above, we will get the x and y position of two points: the current position and the position just a little before now. By creating an imaginary line, we may calculate its angle, and there you have it, the airplanes direction.
为了获得我们平面的旋转角度,我们将使用一点三角函数。使用上述技术,我们将得到两个点的 x 和 y 位置:当前位置和现在之前的位置。通过创建一条假想线,我们可以计算出它的角度,这就是飞机的方向。
func calculateDirection(_ pt1: CGPoint,_ pt2: CGPoint) -> CGFloat {
    let a = pt2.x - pt1.x
    let b = pt2.y - pt1.y

    let angle = a < 0 ? atan(Double(b / a)) : atan(Double(b / a)) - Double.pi

    return CGFloat(angle)
}
Putting it all together 把它们放在一起
Now that we know the tools we need to achieve our goals, we’ll implement the effect:
现在我们知道了实现目标所需的工具,我们将实现该效果:
struct FollowEffect: GeometryEffect {
    var pct: CGFloat = 0
    let path: Path
    var rotate = true

    var animatableData: CGFloat {
        get { return pct }
        set { pct = newValue }
    }

    func effectValue(size: CGSize) -> ProjectionTransform {
        if !rotate { // Skip rotation login
            let pt = percentPoint(pct)

            return ProjectionTransform(CGAffineTransform(translationX: pt.x, y: pt.y))
        } else {
            let pt1 = percentPoint(pct)
            let pt2 = percentPoint(pct - 0.01)

            let angle = calculateDirection(pt1, pt2)
            let transform = CGAffineTransform(translationX: pt1.x, y: pt1.y).rotated(by: angle)

            return ProjectionTransform(transform)
        }
    }

    func percentPoint(_ percent: CGFloat) -> CGPoint {
        // percent difference between points
        let diff: CGFloat = 0.001
        let comp: CGFloat = 1 - diff

        // handle limits
        let pct = percent > 1 ? 0 : (percent < 0 ? 1 : percent)

        let f = pct > comp ? comp : pct
        let t = pct > comp ? 1 : pct + diff
        let tp = path.trimmedPath(from: f, to: t)

        return CGPoint(x: tp.boundingRect.midX, y: tp.boundingRect.midY)
    }

    func calculateDirection(_ pt1: CGPoint,_ pt2: CGPoint) -> CGFloat {
        let a = pt2.x - pt1.x
        let b = pt2.y - pt1.y

        let angle = a < 0 ? atan(Double(b / a)) : atan(Double(b / a)) - Double.pi

        return CGFloat(angle)
    }
}
The full code is available as Example8, in the gist file linked at the top of this page.
完整代码以 Example8 的形式提供,位于本页顶部链接的 gist 文件中。
Ignored By Layout 按布局忽略
Our final tip on GeometryEffect is the method .ignoredByLayout(). Let’s see what the documentation says:
关于 GeometryEffect 的最后一个提示是 .ignoredByLayout() 方法。让我们看看文档是怎么说的:
Returns an effect producing the same geometry transform as “self” but that will only be applied while rendering its view, not while the view is performing its layout calculations. This is often used to disable layout changes during transitions, but that will only be applied while rendering its view, not while the view is performing its layout calculations. This is often used to disable layout changes during transitions.
返回一个效果,该效果生成与“self”相同的几何变换,但仅在呈现其视图时应用,而不是在视图执行其布局计算时应用。这通常用于在过渡期间禁用布局更改,但这只会在渲染其视图时应用,而不会在视图执行其布局计算时应用。这通常用于在过渡期间禁用布局更改。
I’ll be covering transitions soon. In the meantime, let me present an example where using .ignoredByLayout() has some obvious effects. Will see how GeometryReader reports different positions, depending on how the effect was added (i.e, with or without .ignoredByLayout()).
我很快就会介绍过渡。同时,让我举一个例子,说明使用 .ignoredByLayout() 有一些明显的效果。将看到如何 GeometryReader 报告不同的位置,具体取决于效果的添加方式(即,有或没有 .ignoredByLayout() )。
struct ContentView: View {
    @State private var animate = false

    var body: some View {
        VStack {
            RoundedRectangle(cornerRadius: 5)
                .foregroundColor(.green)
                .frame(width: 300, height: 50)
                .overlay(ShowSize())
                .modifier(MyEffect(x: animate ? -10 : 10))

            RoundedRectangle(cornerRadius: 5)
                .foregroundColor(.blue)
                .frame(width: 300, height: 50)
                .overlay(ShowSize())
                .modifier(MyEffect(x: animate ? 10 : -10).ignoredByLayout())

        }.onAppear {
            withAnimation(Animation.easeInOut(duration: 1.0).repeatForever()) {
                self.animate = true
            }
        }
    }
}

struct MyEffect: GeometryEffect {
    var x: CGFloat = 0

    var animatableData: CGFloat {
        get { x }
        set { x = newValue }
    }

    func effectValue(size: CGSize) -> ProjectionTransform {
        return ProjectionTransform(CGAffineTransform(translationX: x, y: 0))
    }
}

struct ShowSize: View {
    var body: some View {
        GeometryReader { proxy in
            Text("x = \(Int(proxy.frame(in: .global).minX))")
                .foregroundColor(.white)
        }
    }
}
What’s Next 下一步是什么
The three examples we worked with today, have very little in common, except that they all use the same protocol to achieve their goals. GeometryEffect is simple. It has a single method to implement, and yet, its possibilities are endless. We just need to apply a little imagination.
我们今天使用的三个例子几乎没有共同之处,只是它们都使用相同的协议来实现他们的目标。GeometryEffect 很简单。它有一个单一的实现方法,然而,它的可能性是无穷无尽的。我们只需要发挥一点想象力。
Next, we will introduce our final protocol in the series: AnimatableModifier. If GeometryEffect is powerful, wait to see all the wonderful things you can do with AnimatableModifier. Here’s a quick preview of the whole series: